Part 1
Experiment with the ES2 synthesizer we covered in class:
• Create a new Logic session, and connect a MIDI keyboard. This can be either your laptop and keyboard at home, or your laptop and the 618 keyboard, or the 618 computer and keyboard.
• Save your project to your student folder on the 618 computer (if using your laptop, you will need to transfer your project to the 618 when the assignment is due).
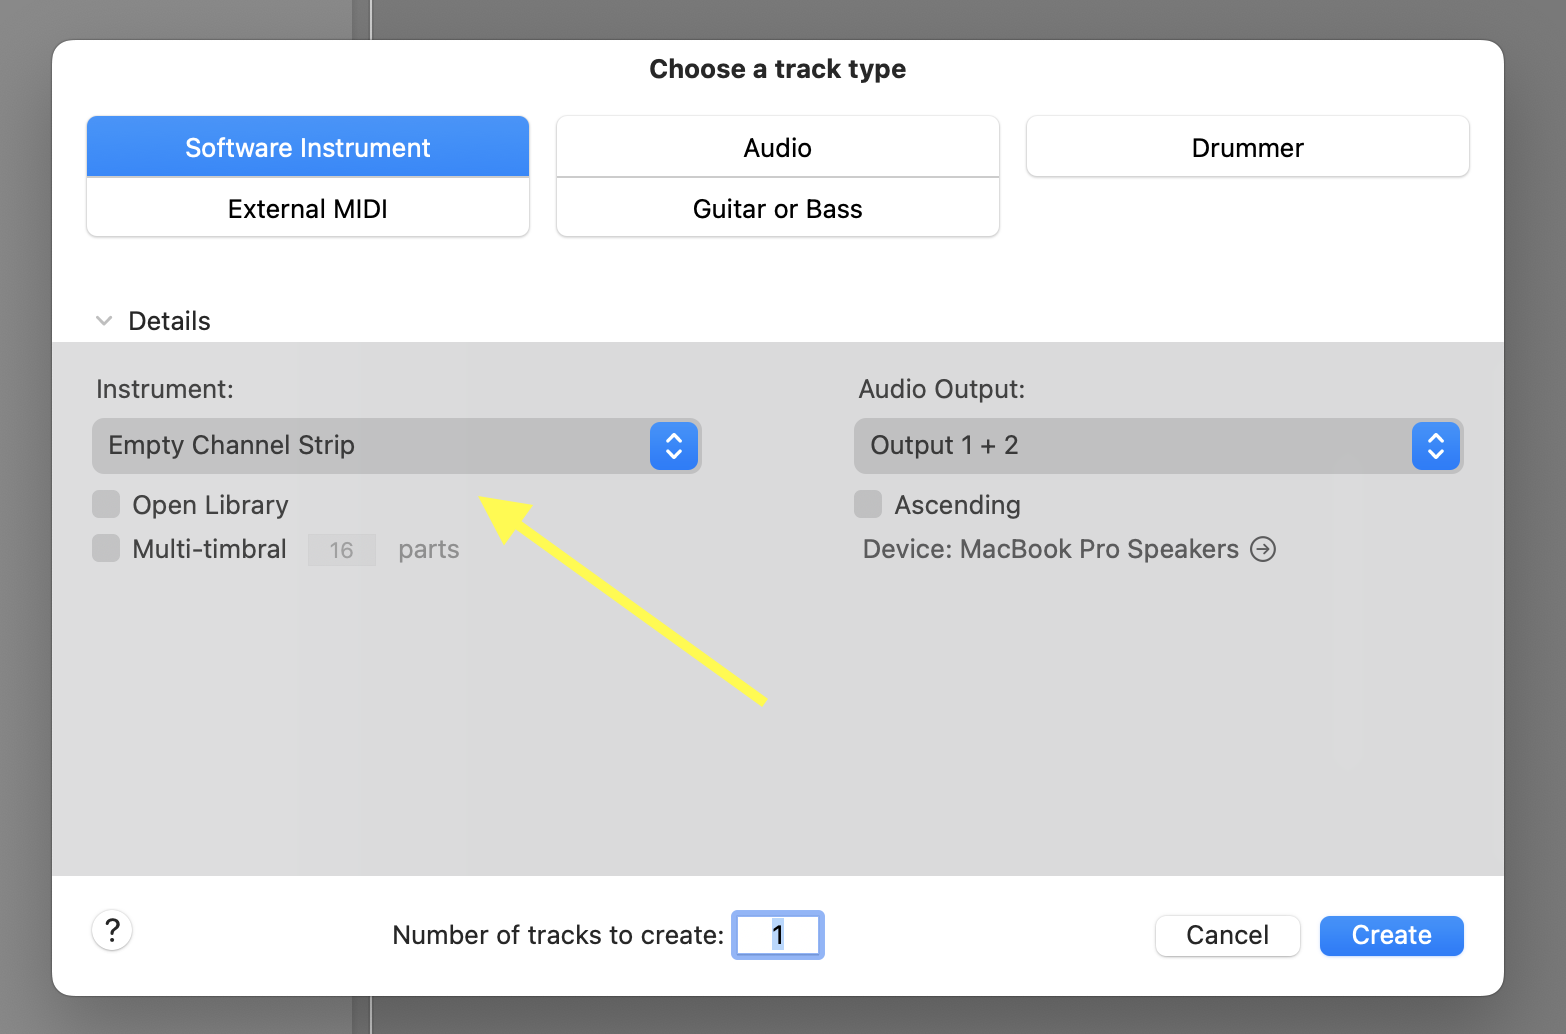
• Create a new Software instrument track (make you choose "Empty Channel Strip" in the "Instrument" section).
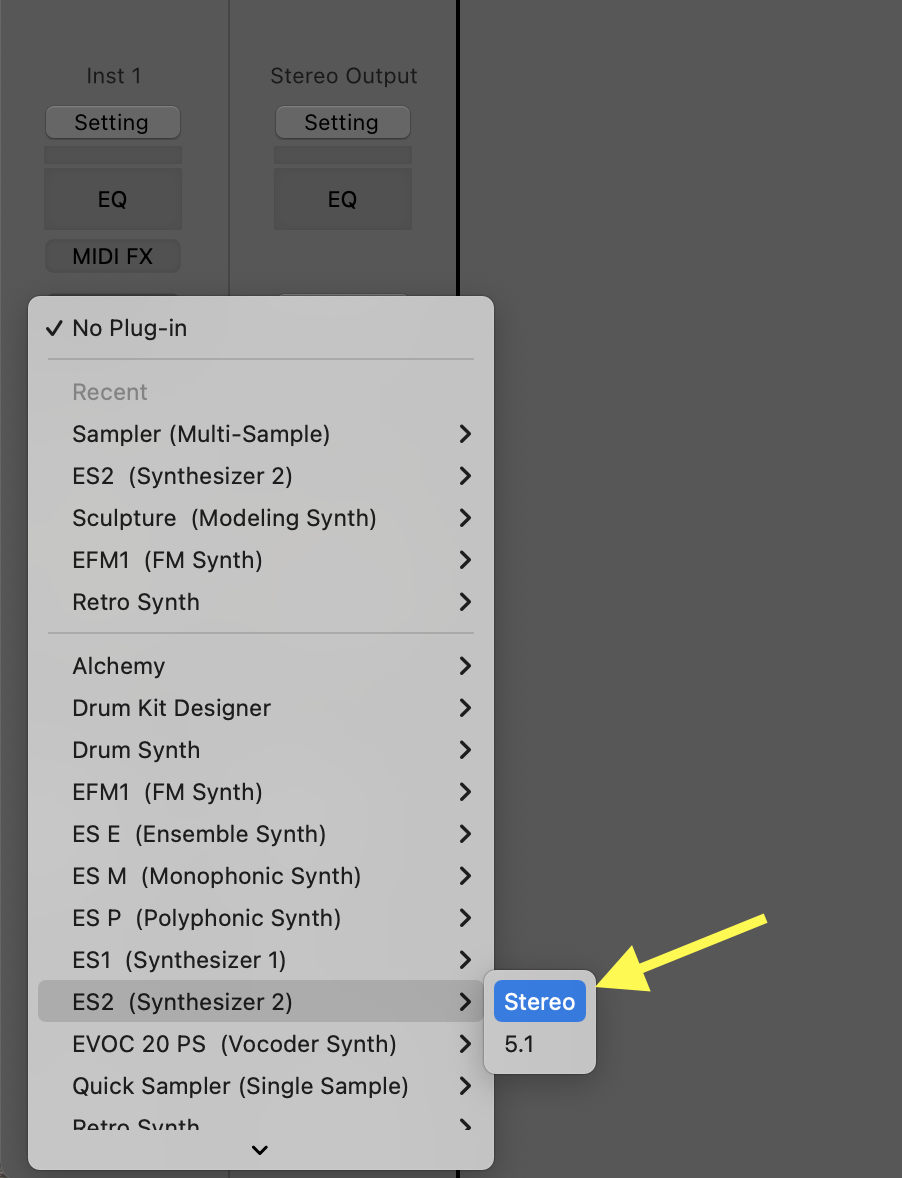
• On the newly created track, choose the ES2 synthesizer.
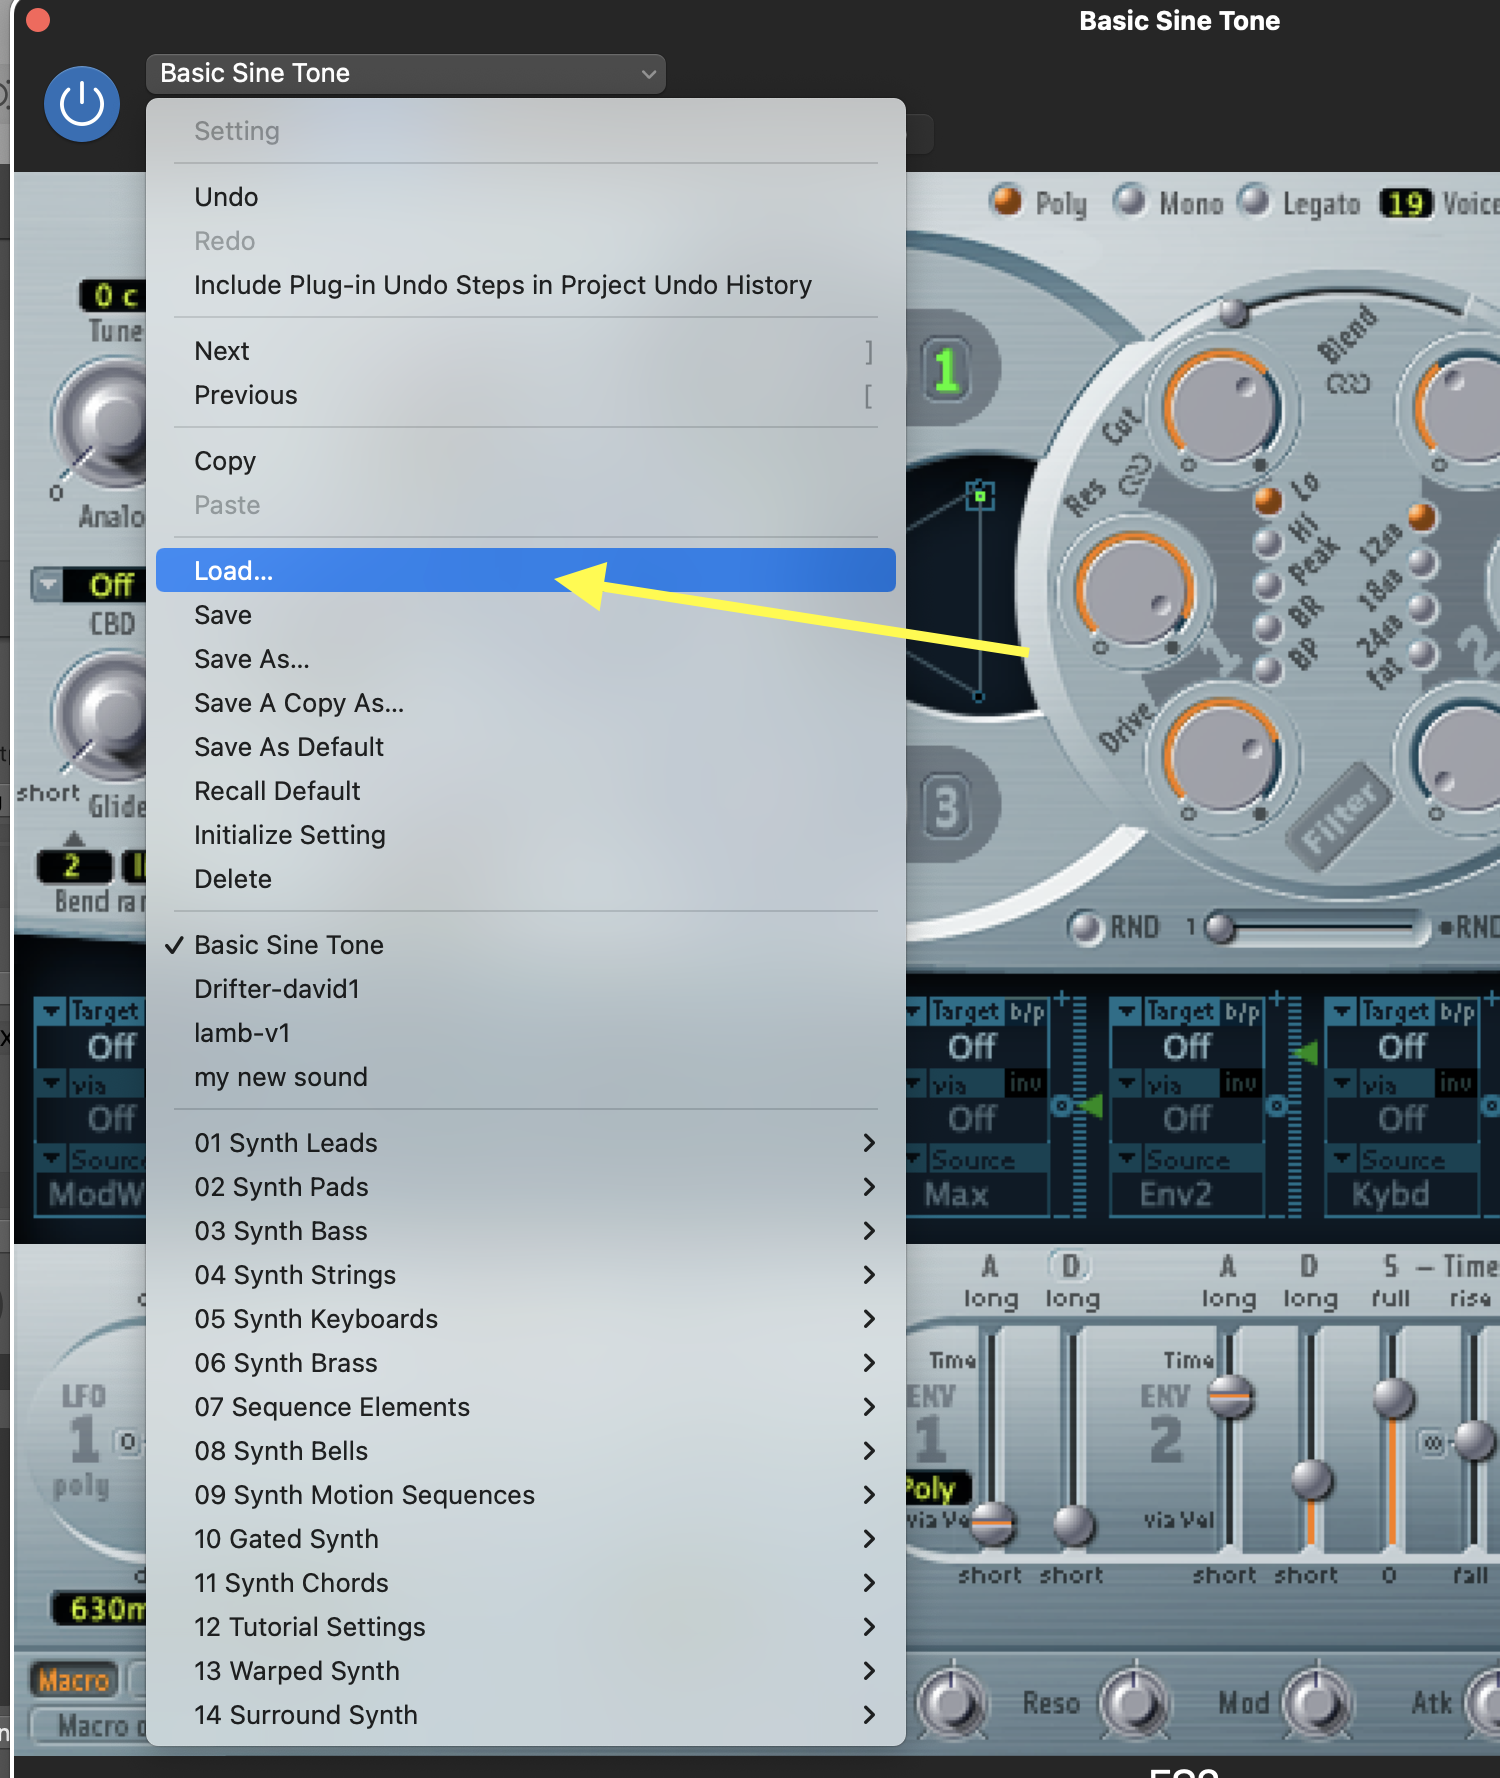
• In the ES2, choose the "Basic Sine Tone" file, which you must download here:
DOWNLOAD PRESET
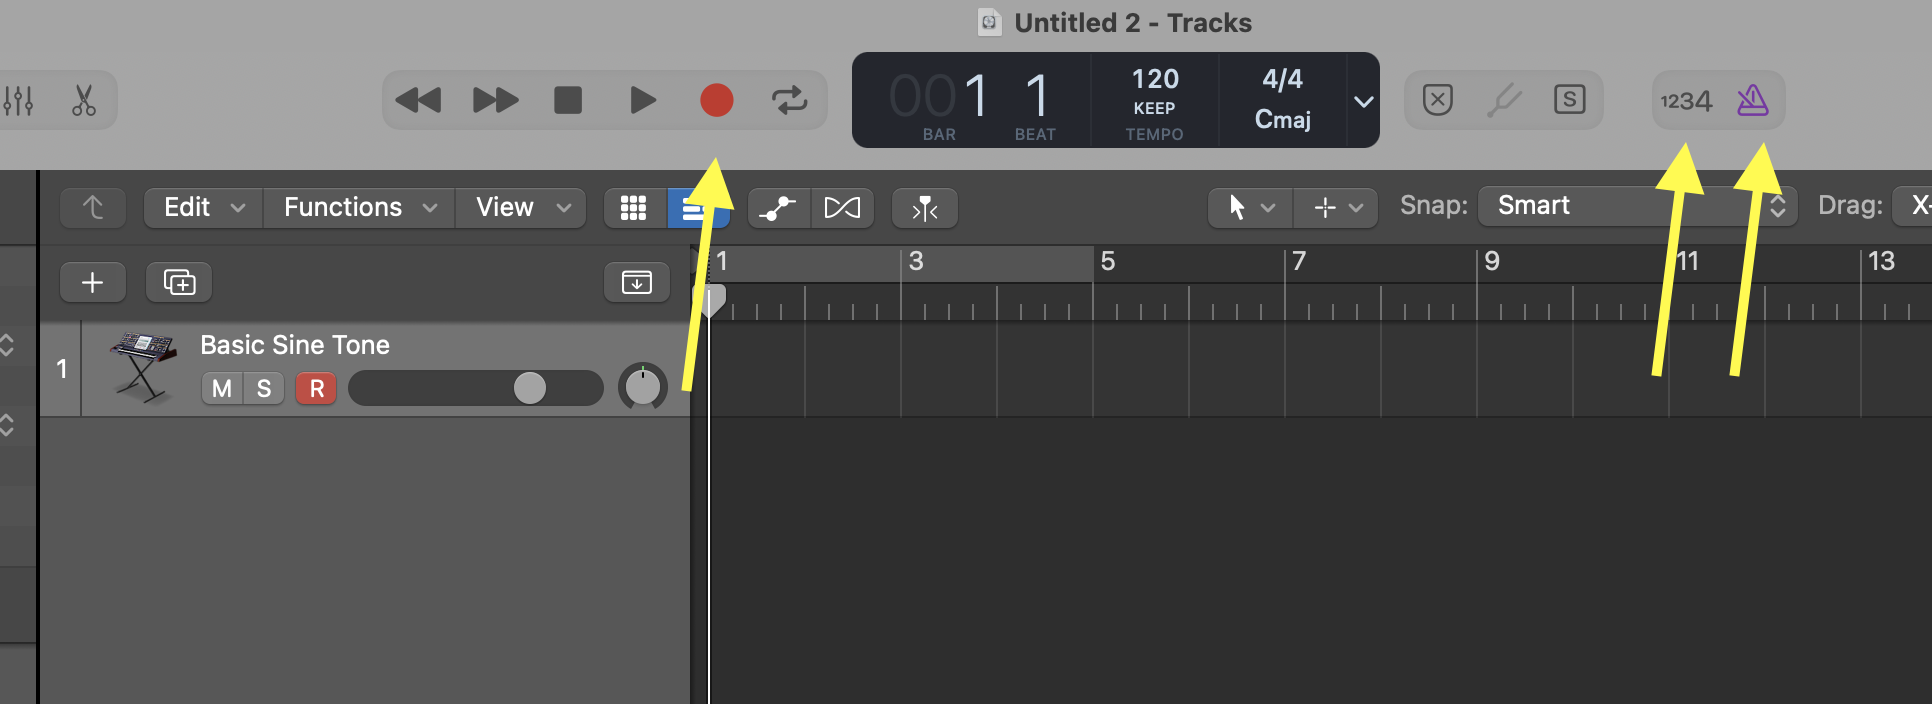
• Click on the RECORD ENABLE button on the track, so that Logic listens to the Keyboard.

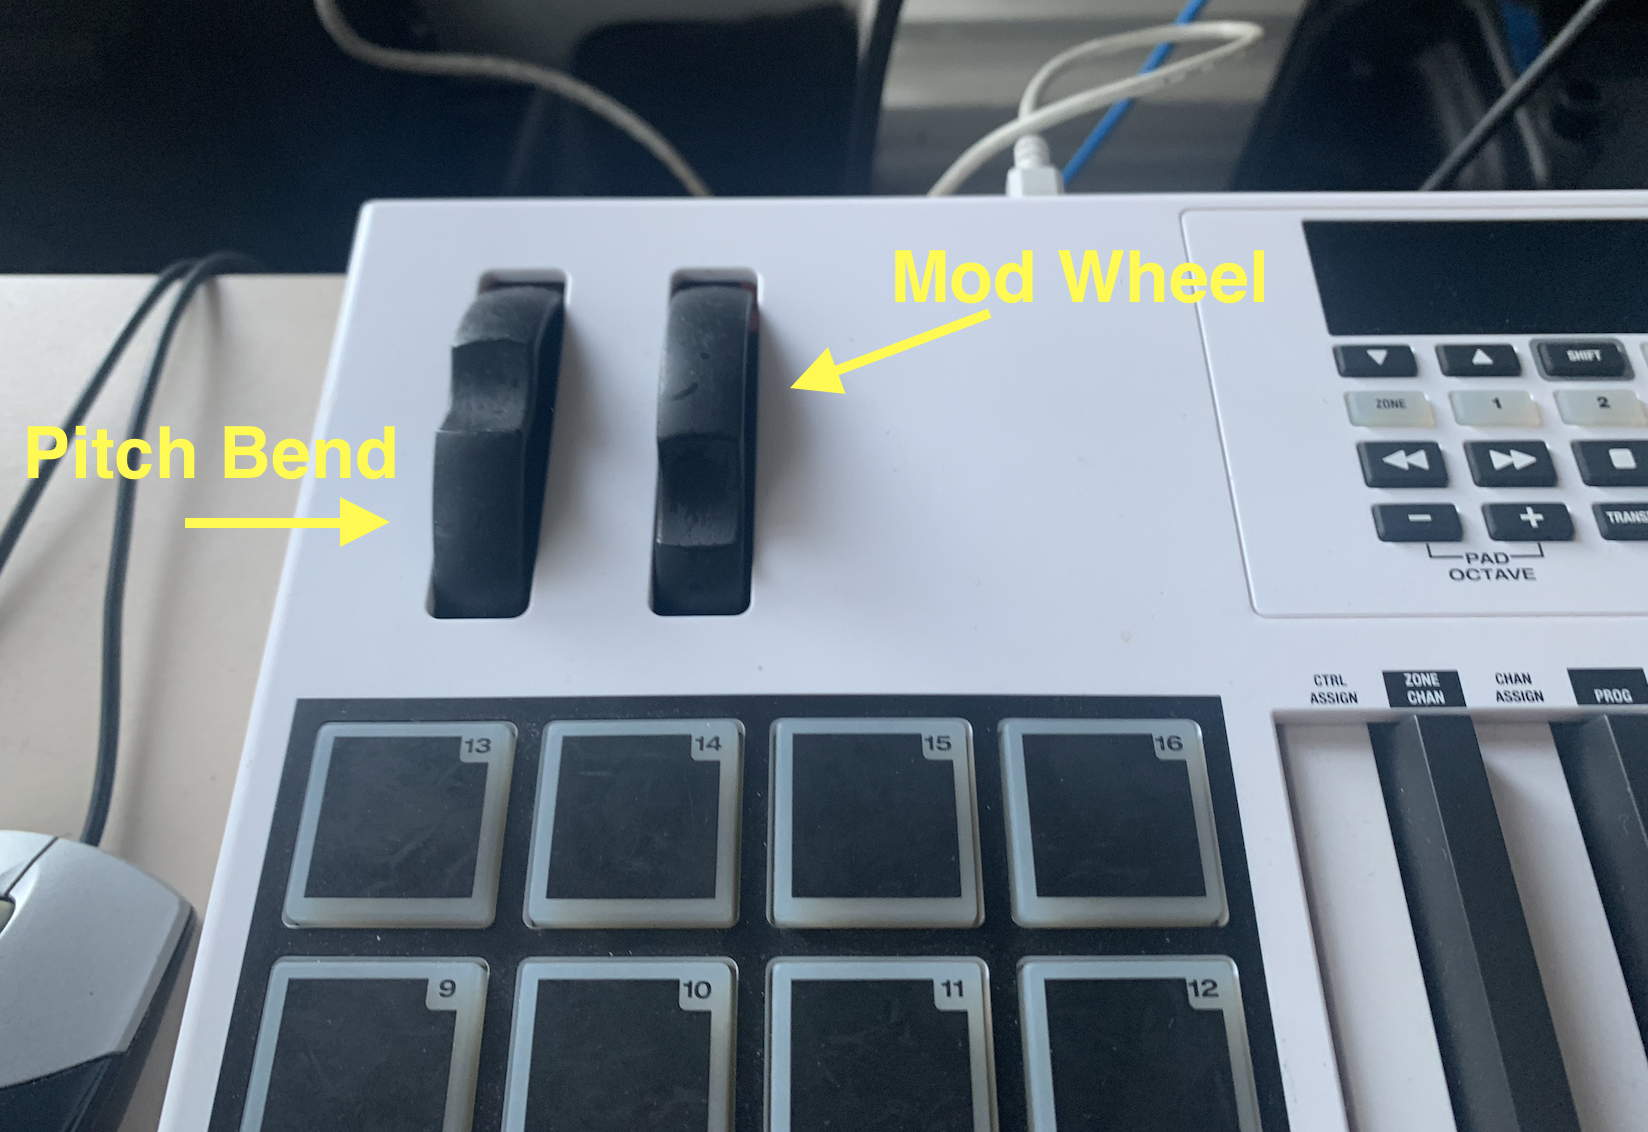
• Play some notes on the keyboard; you should hear sine tones. Try using the PITCH BEND wheel on the keyboard.
****FROM HERE ON, ALWAYS PLAY NOTES ON THE KEYBAORD BETWEEN EACH STEP TO HEAR WHAT YOU'RE DOING.****
• Start by trying the POLY, MONO, and LEGATO modes, along with the number of voices. How does each one affect the sound? Try the UNISON mode; remember that this works in conjunction with the "ANALOG" knob. How does each one affect the sound?
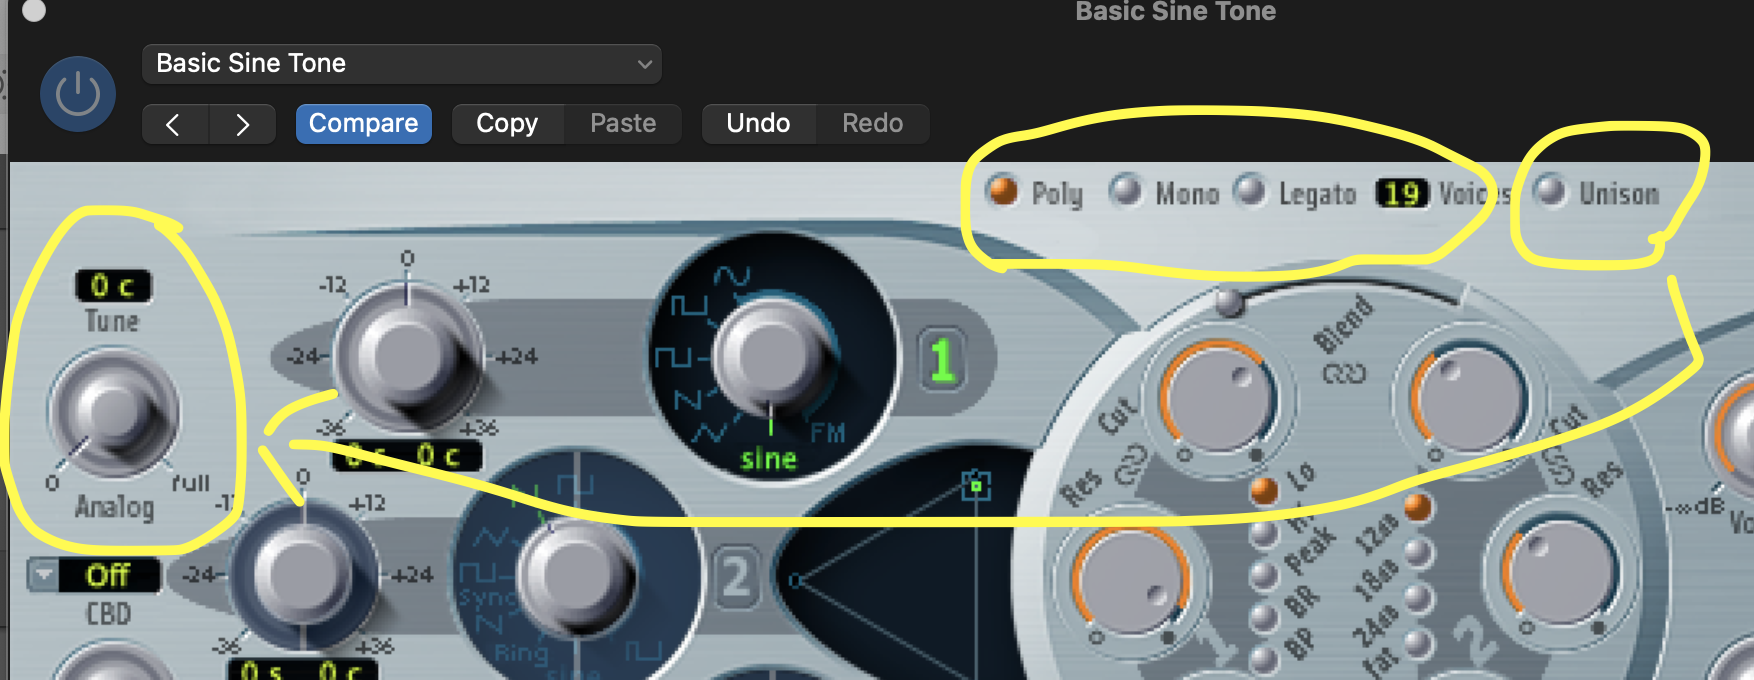
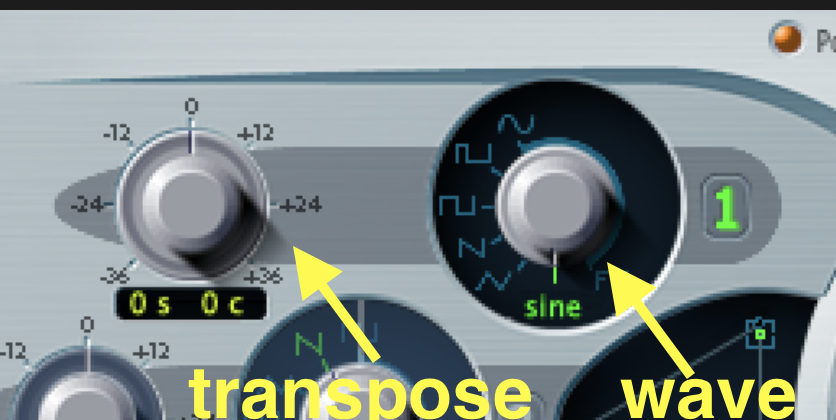
• Try the various WAVE types on the TONE GENERATOR 1; then try the PITCH knob (both for semi tones, and cents).
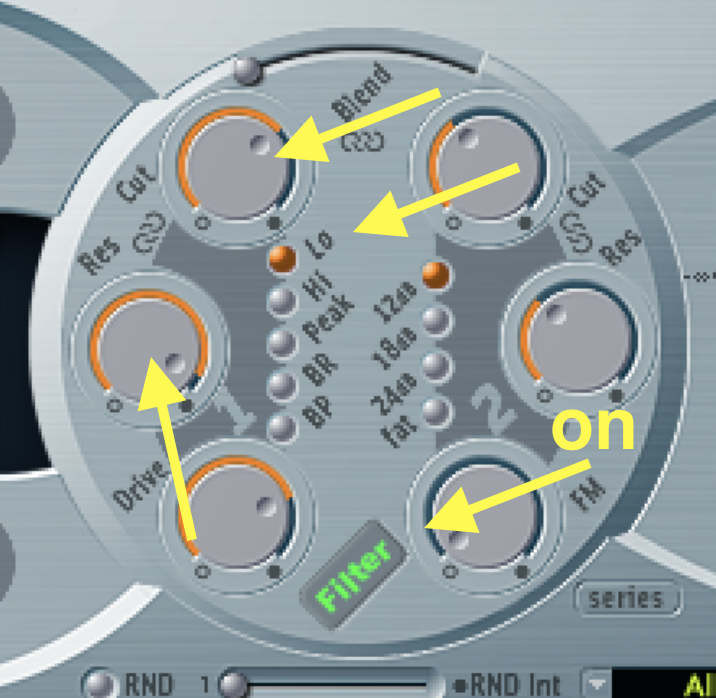
• Turn on the FILTER, make sure FILTER 1 (on the left) is set to LO mode, then play around with the CUT knob. What is going on? Try changing the RES knob.
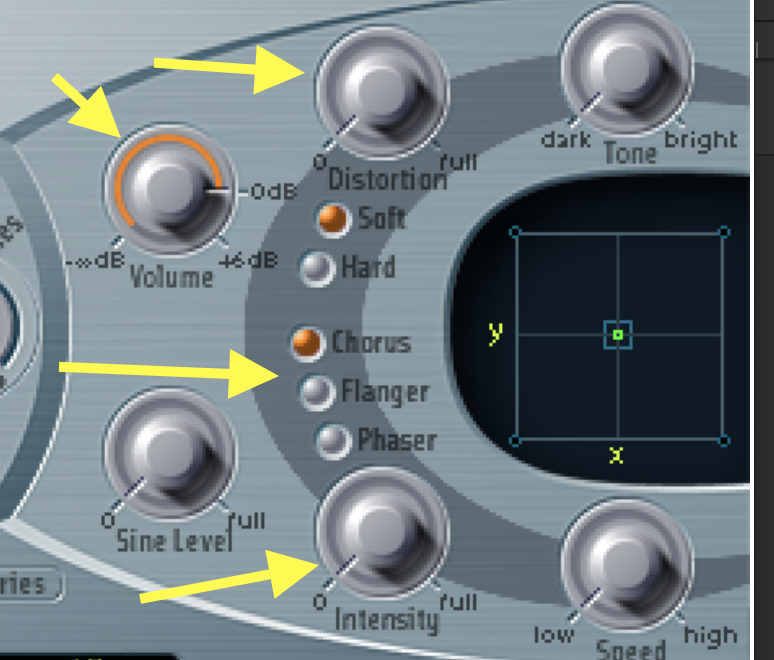
• Add some DISTORTION, and some CHORUS (also try FLANGER or PHASER); adjust the VOLUME if it gets too loud.
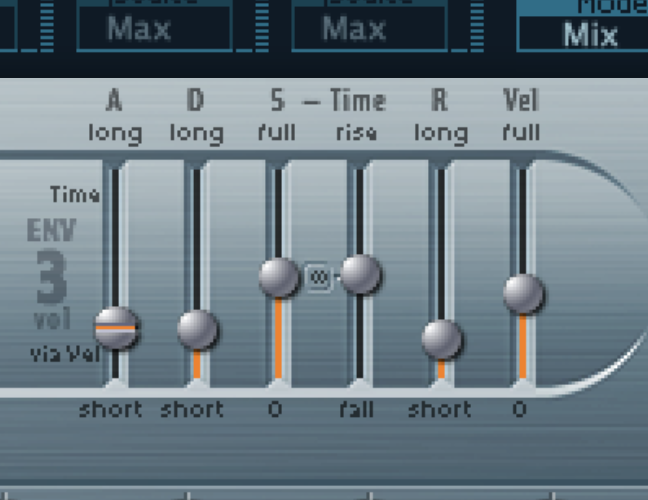
• Adjust the various values of the ADSR 3 envelop. Try the following: 50ms Attack, 50ms Decay, 0.05 Sustain, and 50 Release; then try 4000ms Attack, 100ms Decay, 1. Sustain, and 4000 Release.
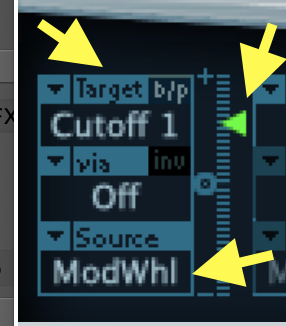
• Try controlling the CUT knob of the FILTER 1 using the MODWHEEL on the keyboard: Choose CUTOFF 1 as the TARGET, MODWHL as the SOURCE, and adjust the green slider to about 0.6. Play some notes and move to the MODWHEEL on the keyboard to hear filtering effect.
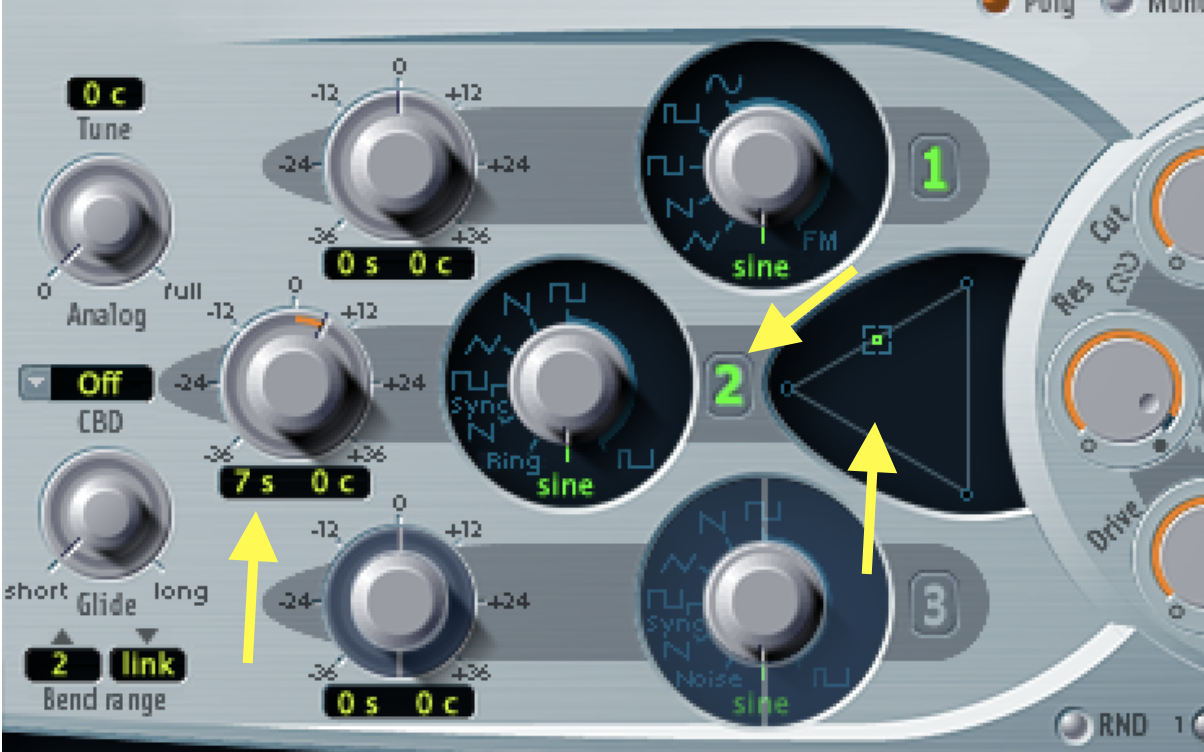
• TURN on TONE GENERATOR 2, and change the PITCH to 7 semi-tones.
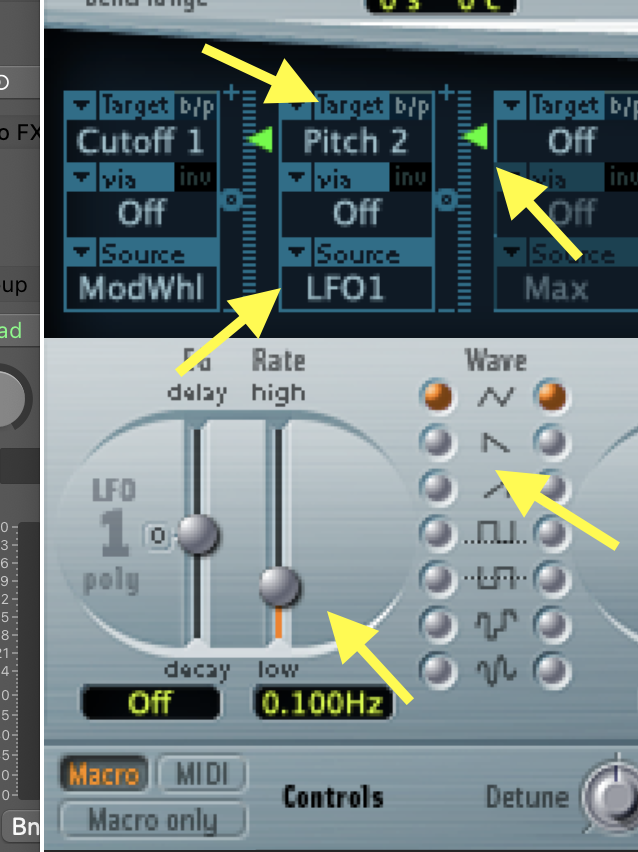
• Try controlling the PITCH of the TONE GENERATOR 2 using the LFO 1: Choose PITCH 2 as the TARGET, LFO1 as the SOURCE, and adjust the green slider to about 0.6. Then change the RATE slider and try out different WAVE types.
• Hit RECORD in Logic (make the sure the count-in and click are turned OFF), and improvise on the keyboard; fell free to change any setting on the ES2. Once done save your work, quit Logic, and put the black dust cover back on the keyboard.
Part 2
Experiment with EQ
• Create a new track on the Logic project for Part 1. Make sure you have a MIDI keyboard connected; this can be either your laptop and keyboard at home, or your laptop and the 618 keyboard, or the 618 computer and keyboard.
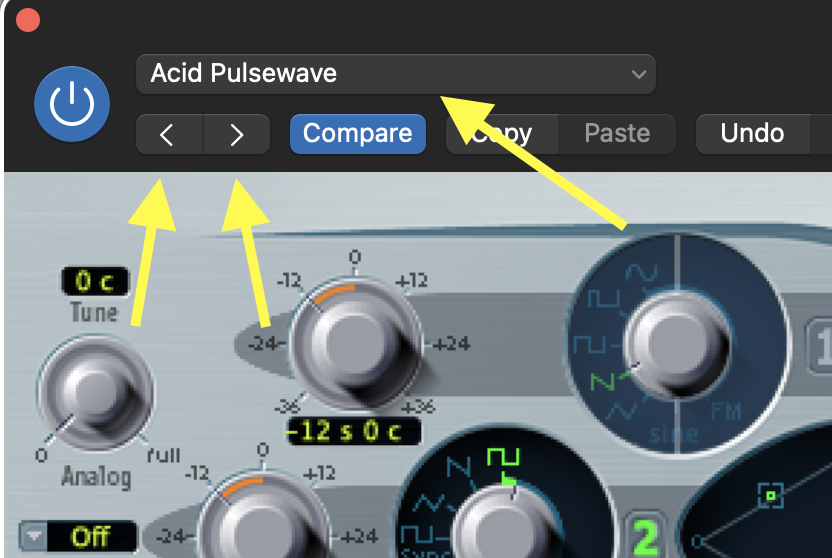
• On the new track, load the ES2 synth, and choose a preset that you like. To do this, simply choose the first preset on the list, then, WHILE PLAYING ON THE KEYBOARD, click on the LEFT and RIGHT arrows to go to the next preset. Stop when you find something you like; however, choose something that's harmonically rich (not just pure sine tones).
• Record a short 15 sec improvisation; make sure you play some low notes.
• To create a cycle around you improvisation (i.e., looping the playback), click on the midi region that you just created, and hit "command-u" on the computer keyboard. This will make a cycle area around your region, which you will see as a yellow band at the top of the arrange window. You can press the "c" computer key to turn on and off the cycle. You can also click and drag the left and right end of the yellow band to adjust the cycle length.

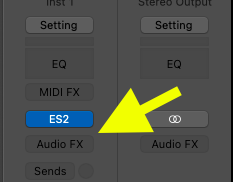
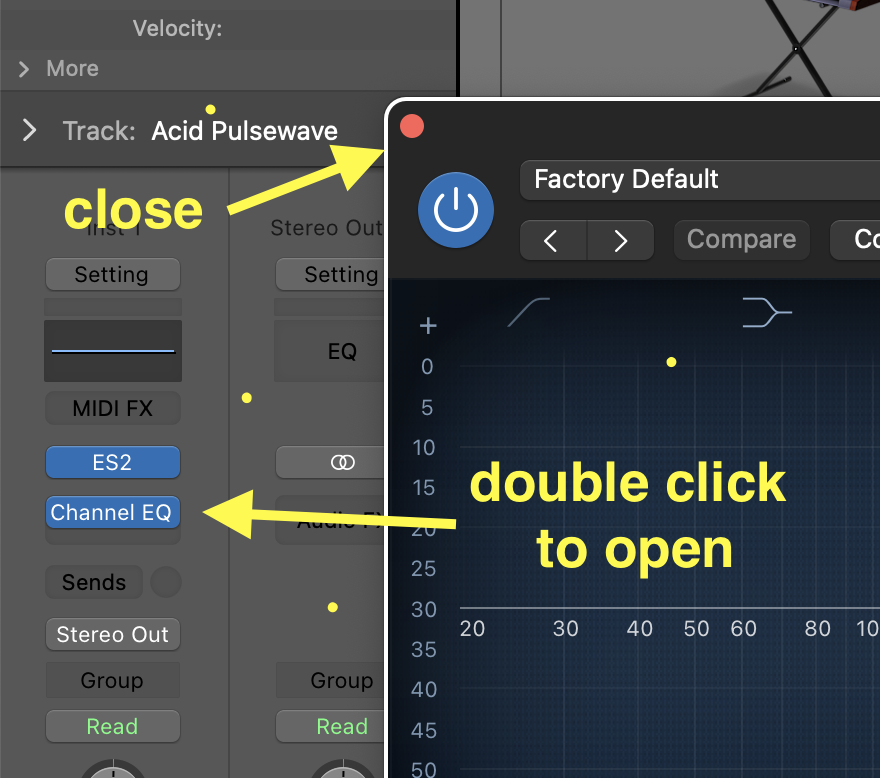
• Add an EQ plugin to the track.
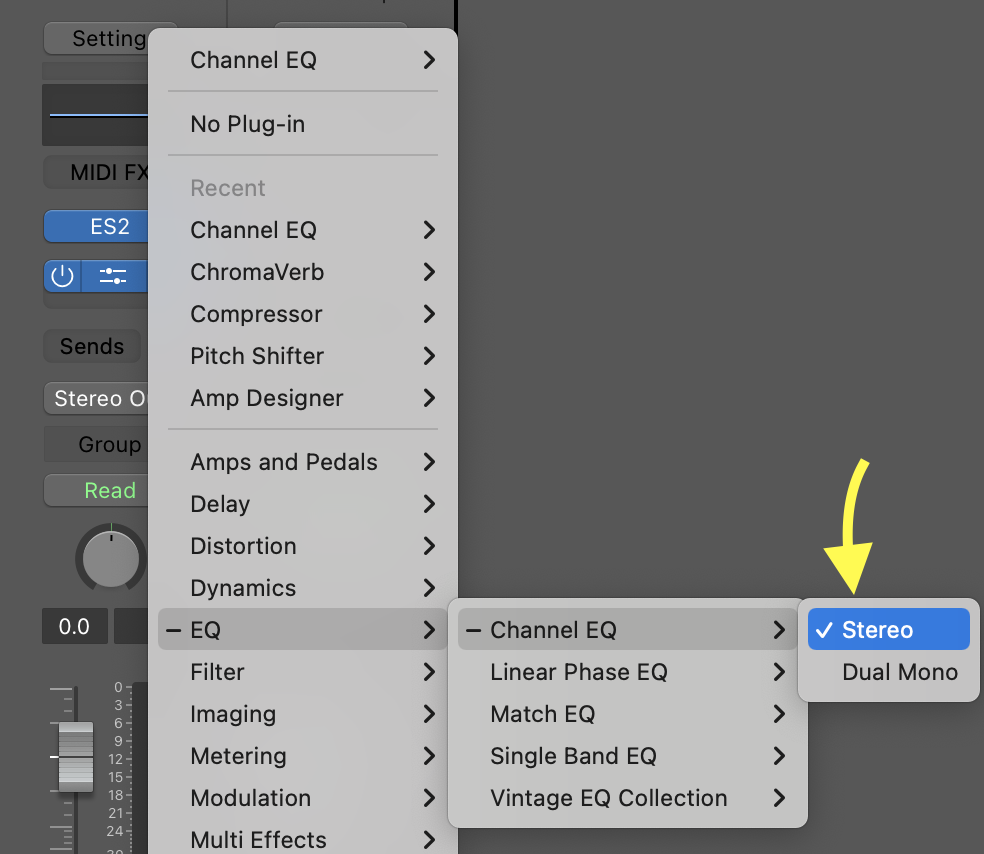
• The EQ window will automatically open. To close it, click on the RED circle at the TOP LEFT of the EQ window; to open it again, double-click on the plugin slot.
• Hit spacebar to hear your improv.
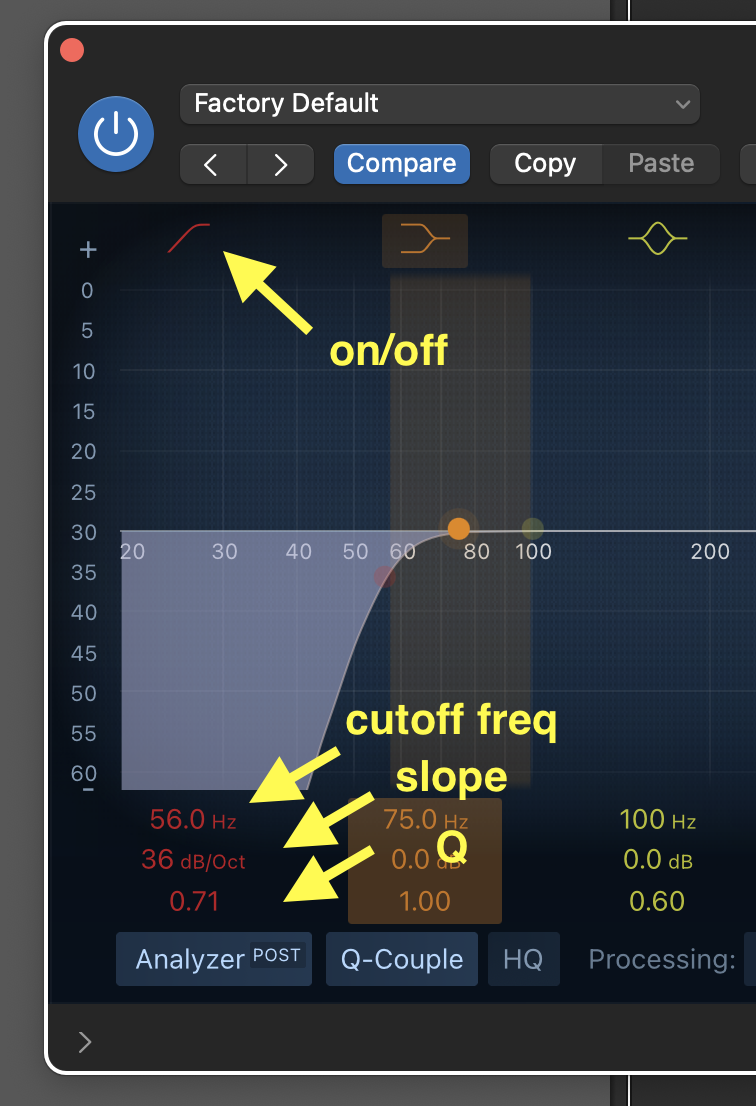
• On the EQ, turn-on the low-cut filter, and play around with the frequency, slope, and Q. Make sure you can hear the effect of each parameter. Do the same for the high-cut filter.
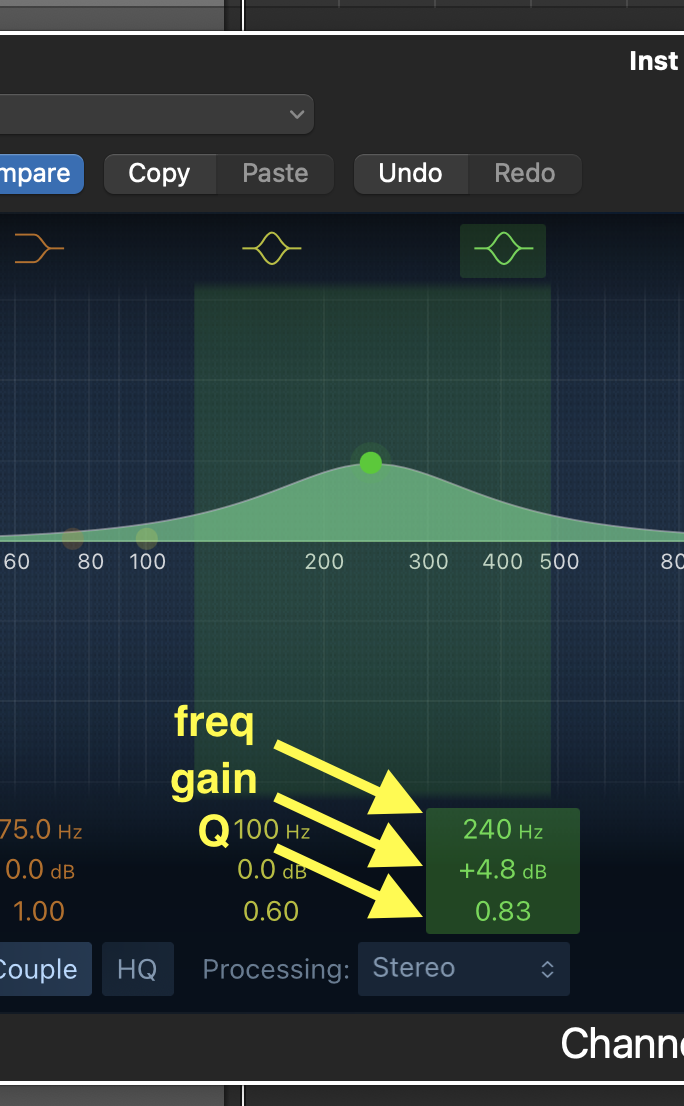
• Try the shelf filters and band filters. Always make sure you hear the effects of the parameter you're using.
• Hit spacebar again to stop playback.
Creating loops
• There are many ways to create loops in Logic. Here we will look at three ways:
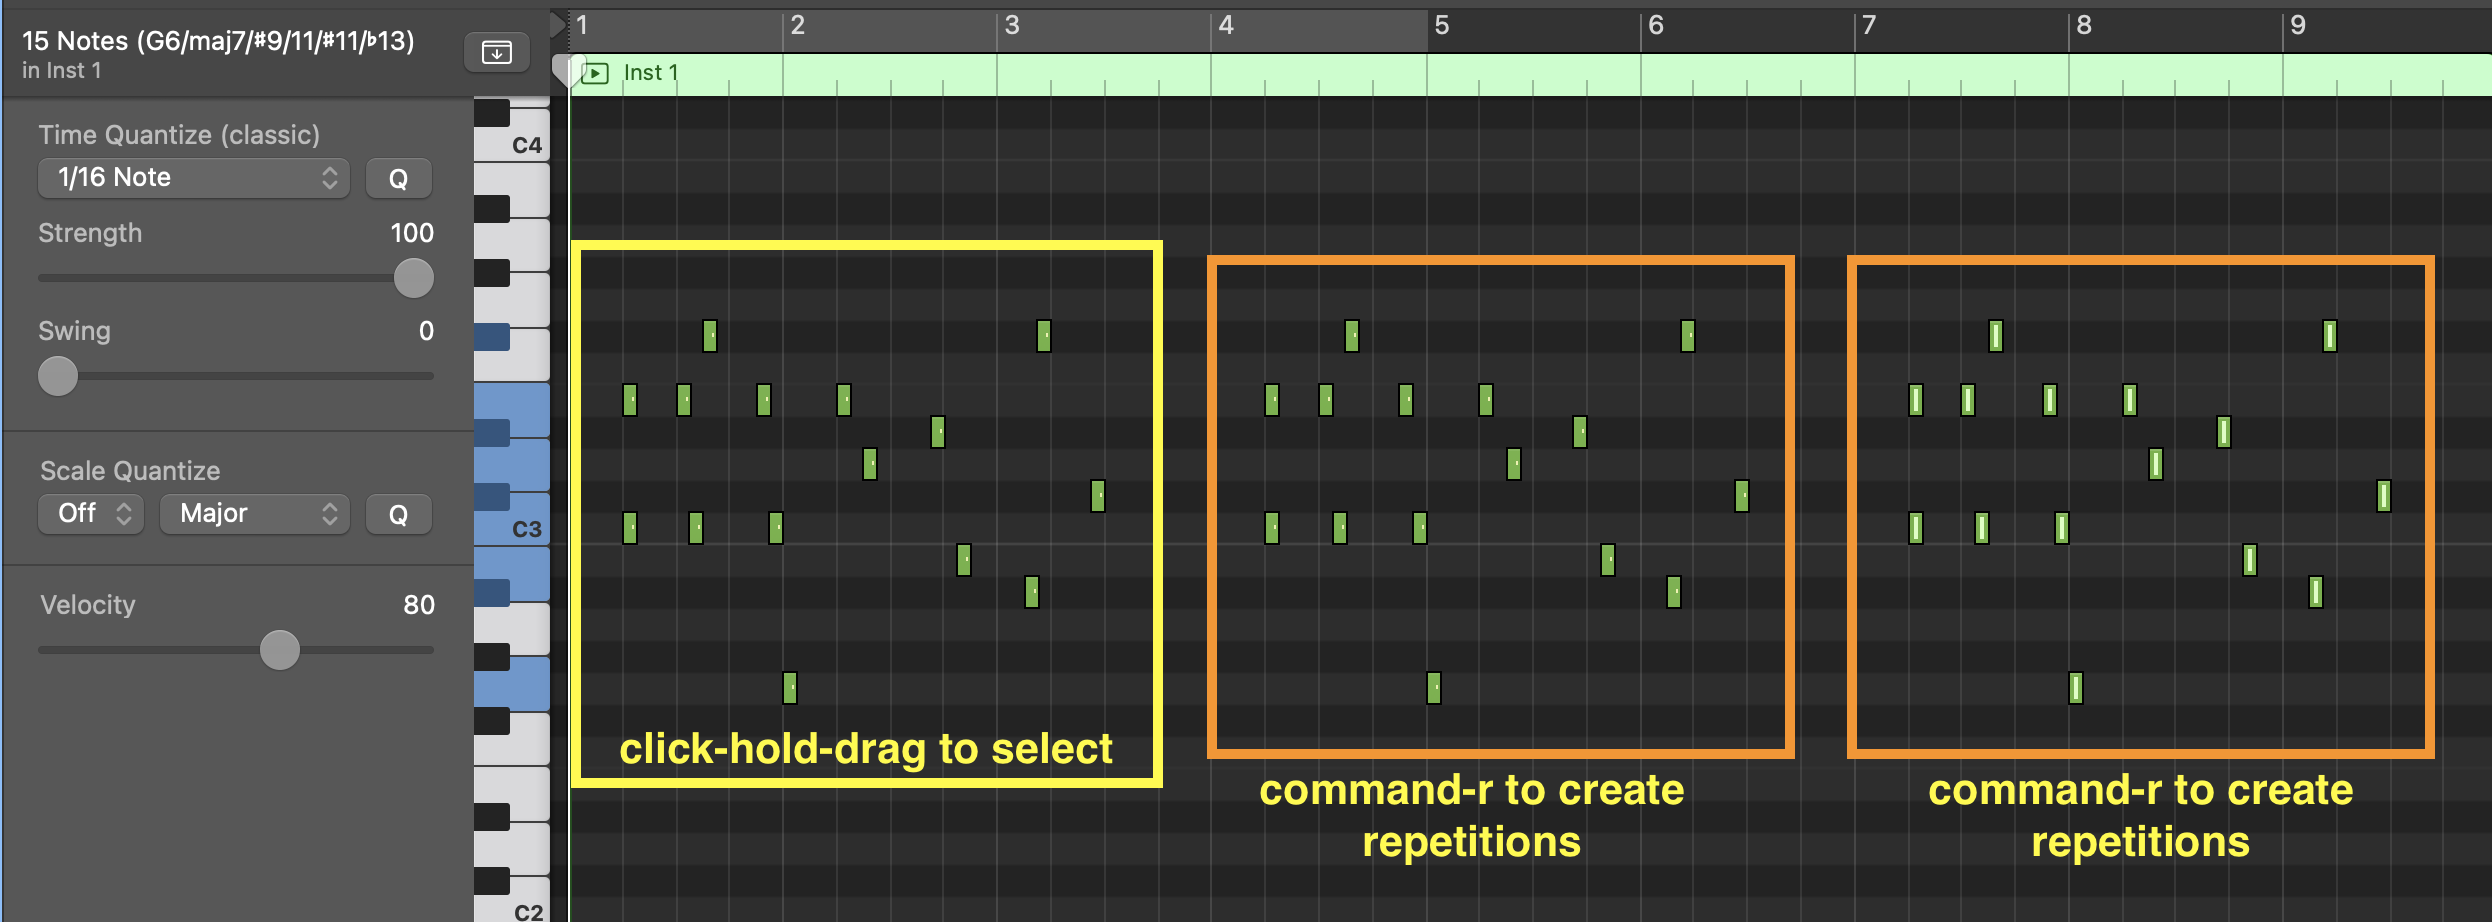
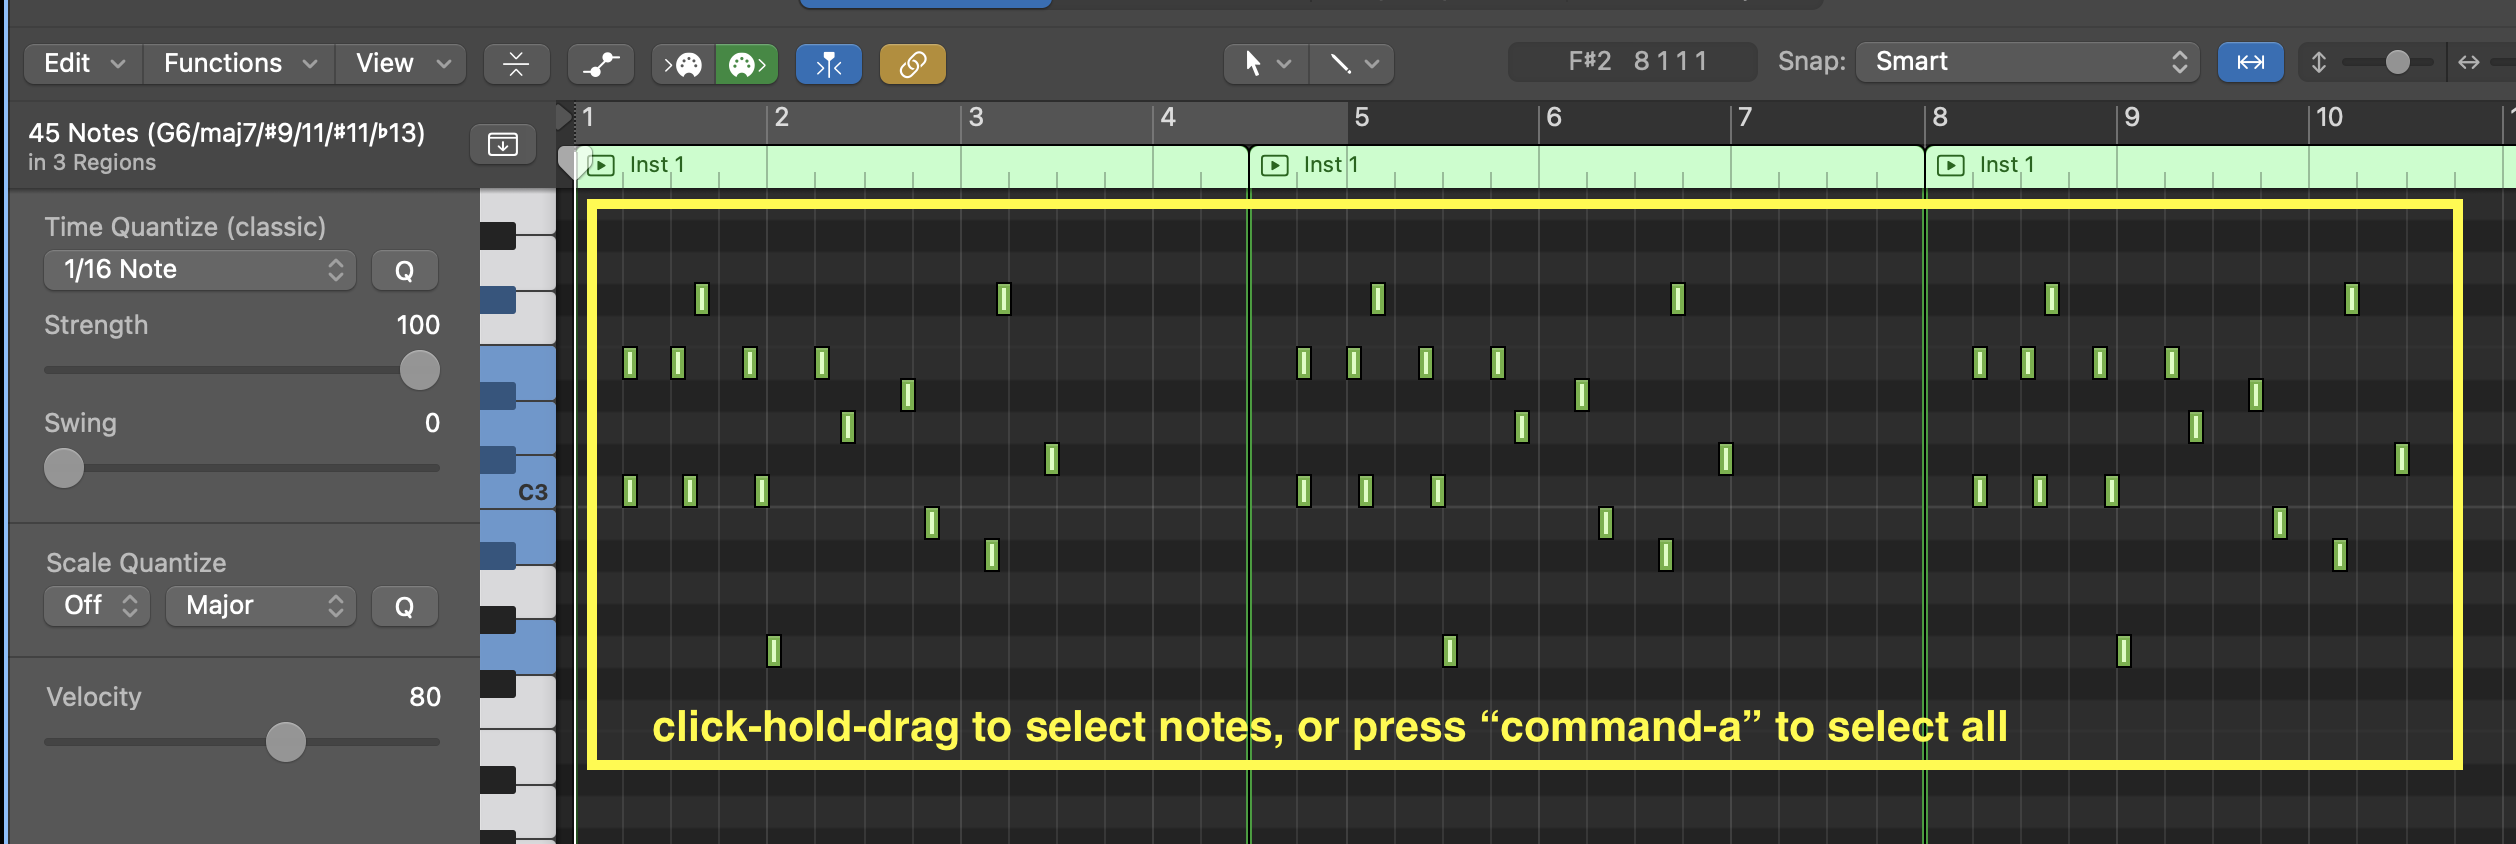
1) Double-click on the region to open the piano-roll. Click-hold-drag to select a group of notes from your improve, then choose Edit>Repeat>Once (or press "command-r"). The notes you selected will be repeated at the same location but in the following measure.
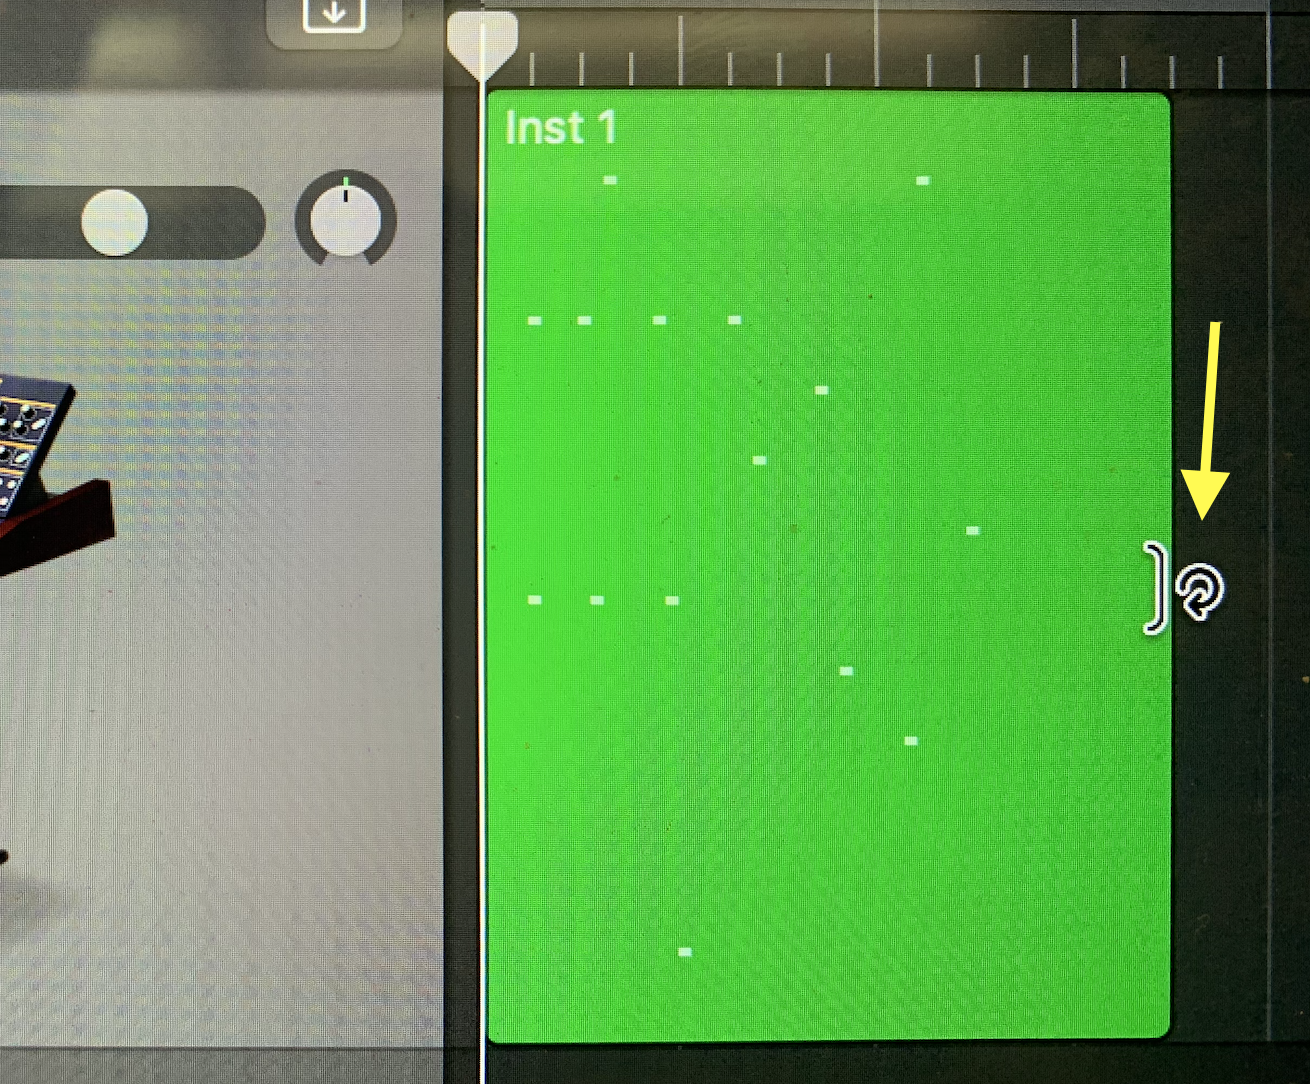
2) Press "command-z" to undo what you just did, then press the "p" on the computer keyboard to exit the piano roll. In the arrange window, move your cursor to the center of the right edge of the MIDI-region. The cursor will change to a circle with an arrow. Click-drag to the right to create loops.
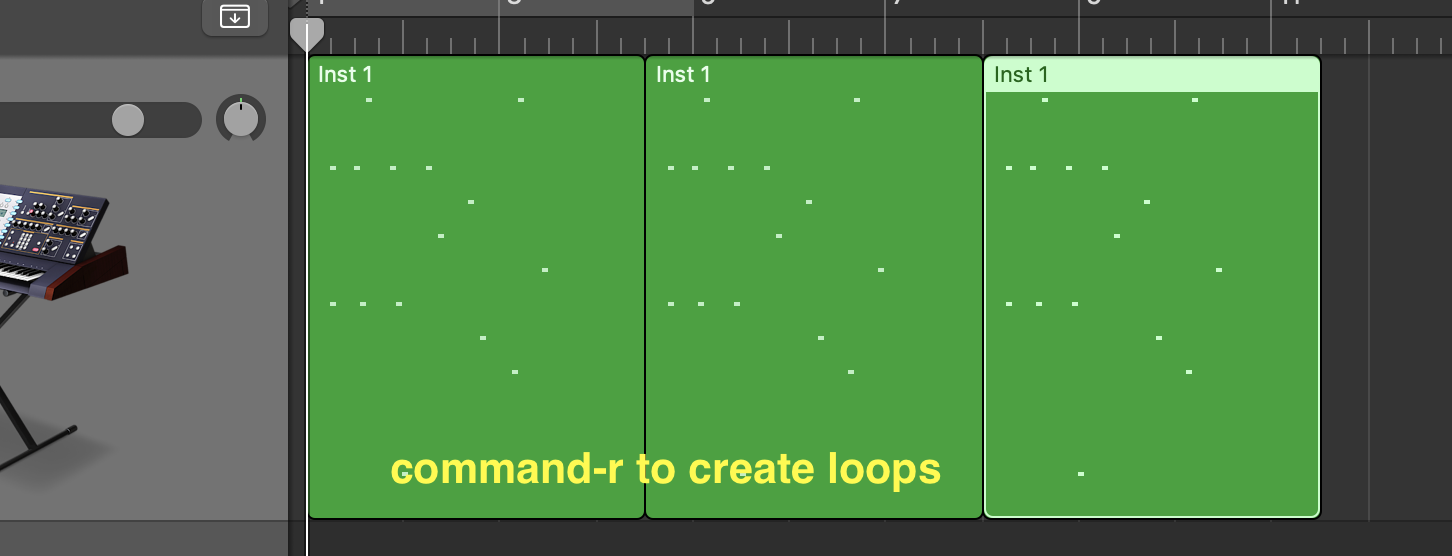
3) Press "command-z" on the computer keyboard to undo the loops you just created, then click on the first region, and press "command-r"; the entire region will be repeated exactly. Create three loops. Keep these loops for the reminder of the assignment.
Create a filter sweep using automation
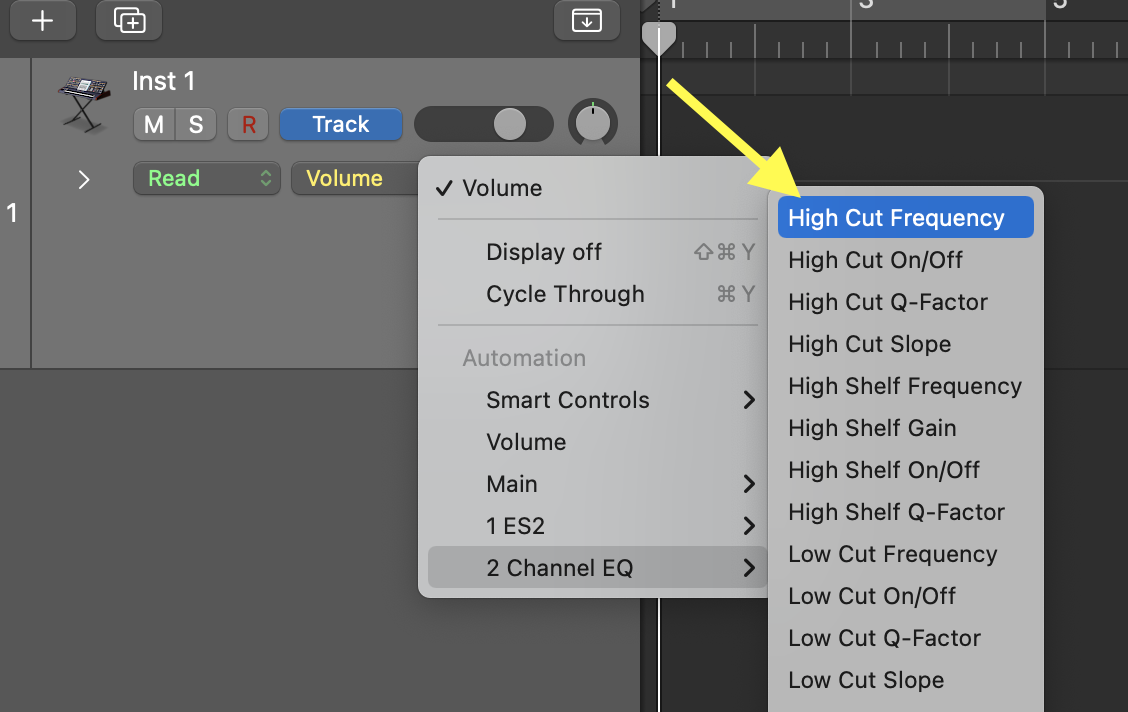
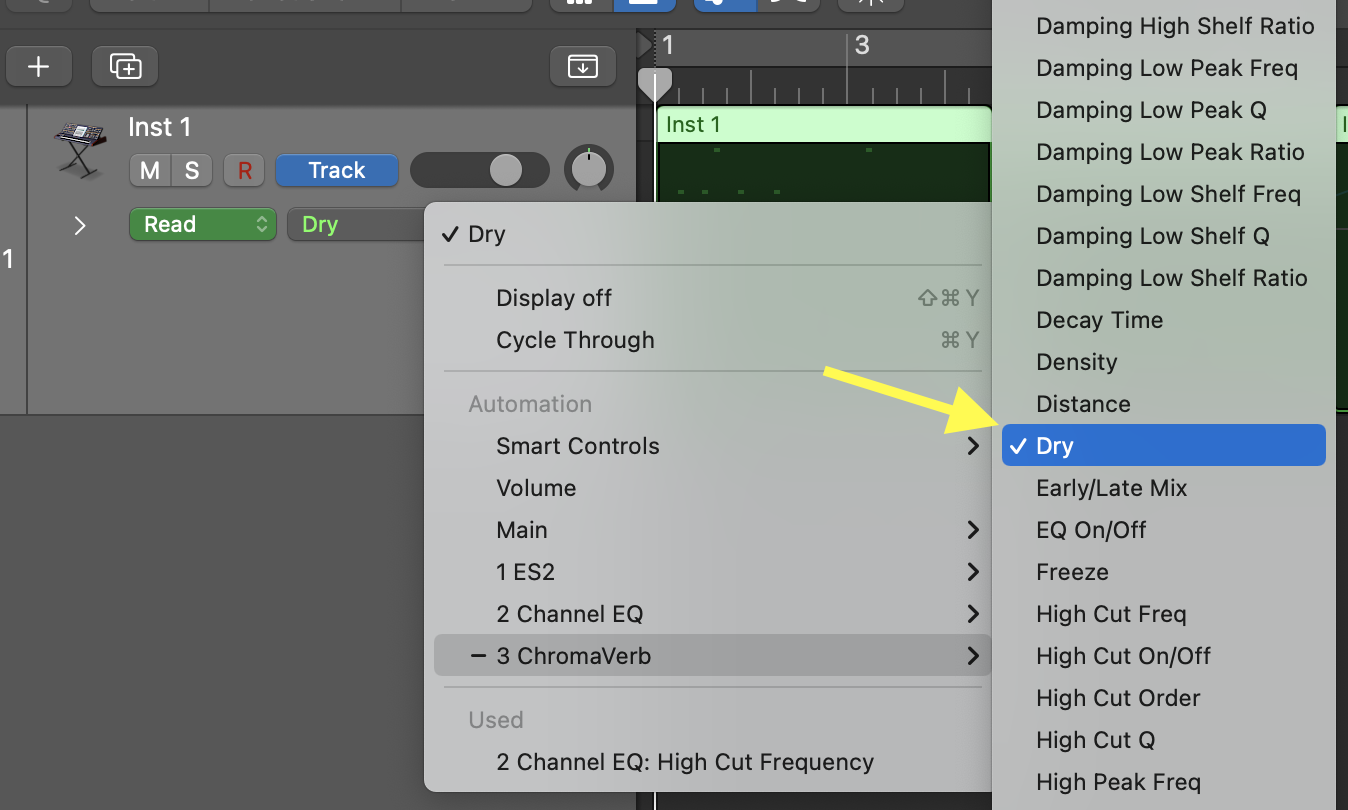
• Hit the "a" key on the computer keyboard (this turns-on automation), then choose "High-Cut Frequency" from the menu on the track. Make sure the high-cut filter is turned ON in the EQ.
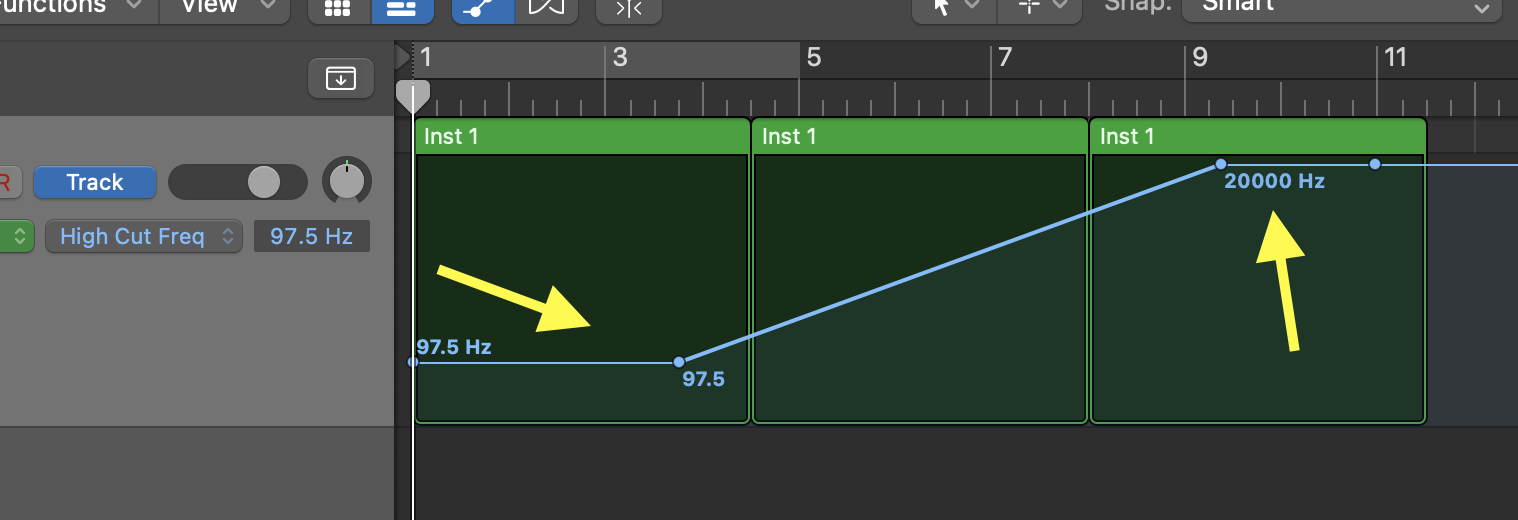
• Towards the beginning of the MIDI region, click on the line on the track to create an automation point, then drag this point to about 100Hz; then click to create another point towards the end of the third loop, and drag this point to 20,000Hz. You can use the eraser tool to delete automation points (hit "t" to open the tool palette, then choose the eraser tool).
• Hit spacebar to play. Adjust the automation points to improve the sound, if needed.
***NOTE: almost anything you can click on in Logic can be automated the same way. In future assignments, you will need to automate volume and panning; make sure you know how to do this (HINT: it's the same as above, except choose "volume" or "panning" on the track menu).***
Quantizing
• Type "a" to turn OFF the automation mode, select all three loops you've created, and double click on them. This will open the "piano-roll" editor. Click-hold-drag to select all the note you played.
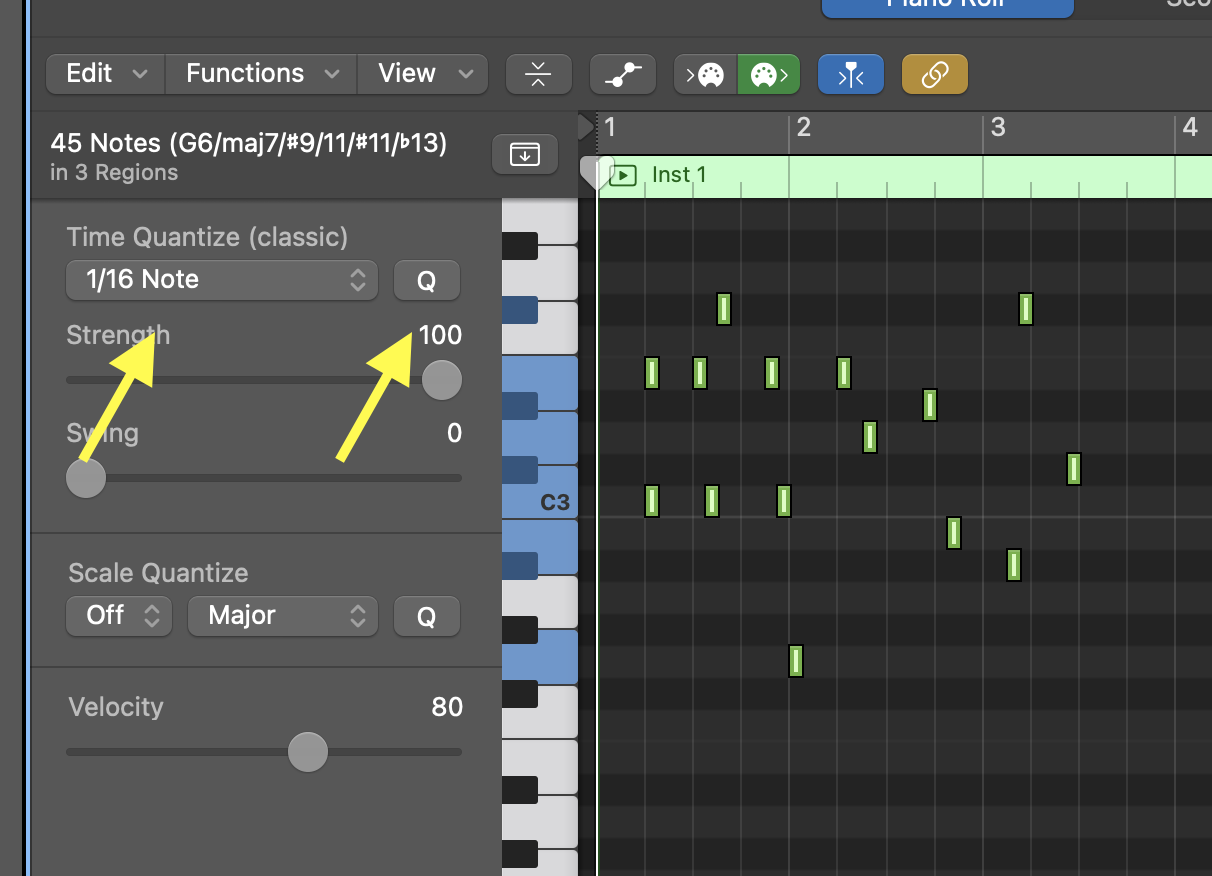
• Click the "Q" button on the left of the piano roll. This will move all your notes to the nearest 1/16 note. Press "command-z" on the computer keyboard to undo what you just did, then choose 1/8 note and click the "Q" again: your notes are now moved to the nearest 1/8 note.
Using Reverb
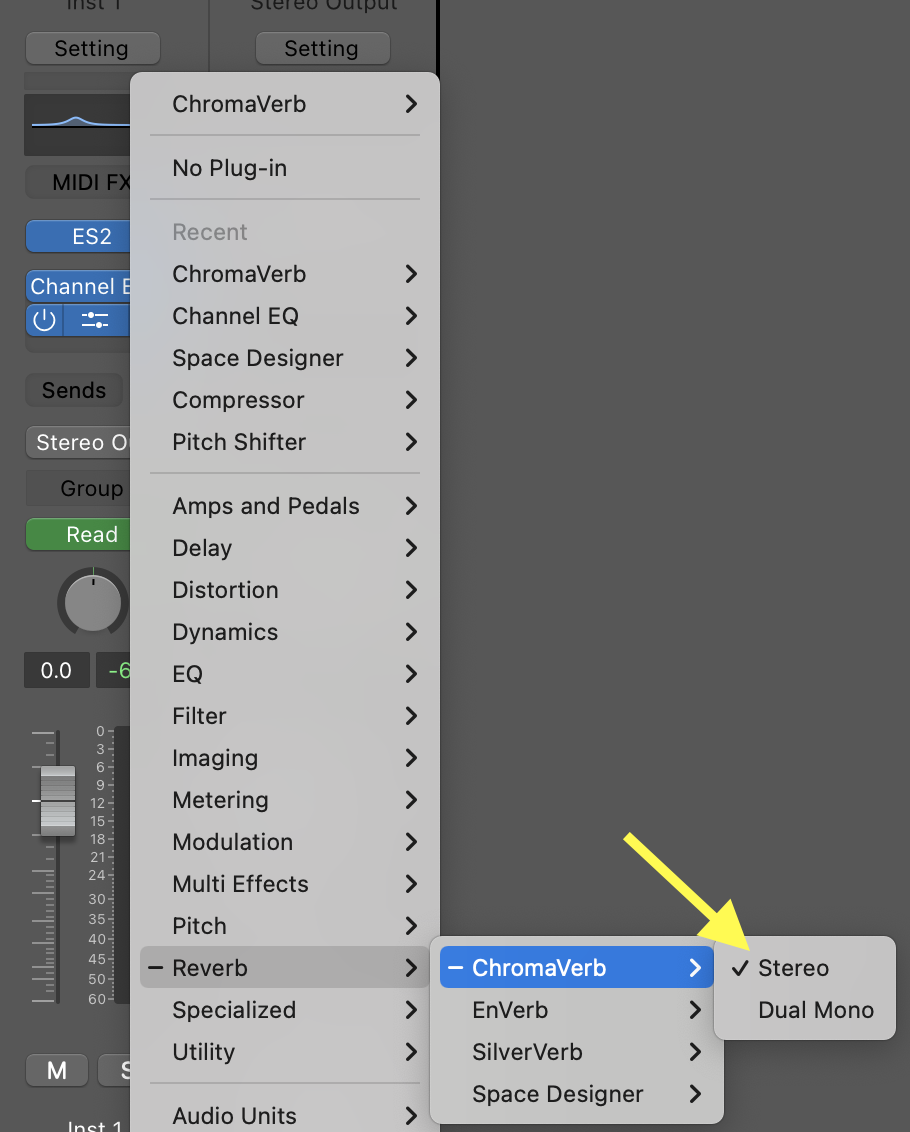
• On the next plugin slot after the EQ, choose "ChromaVerb". Choose the "Concert Hall" preset (in the "Halls" category).
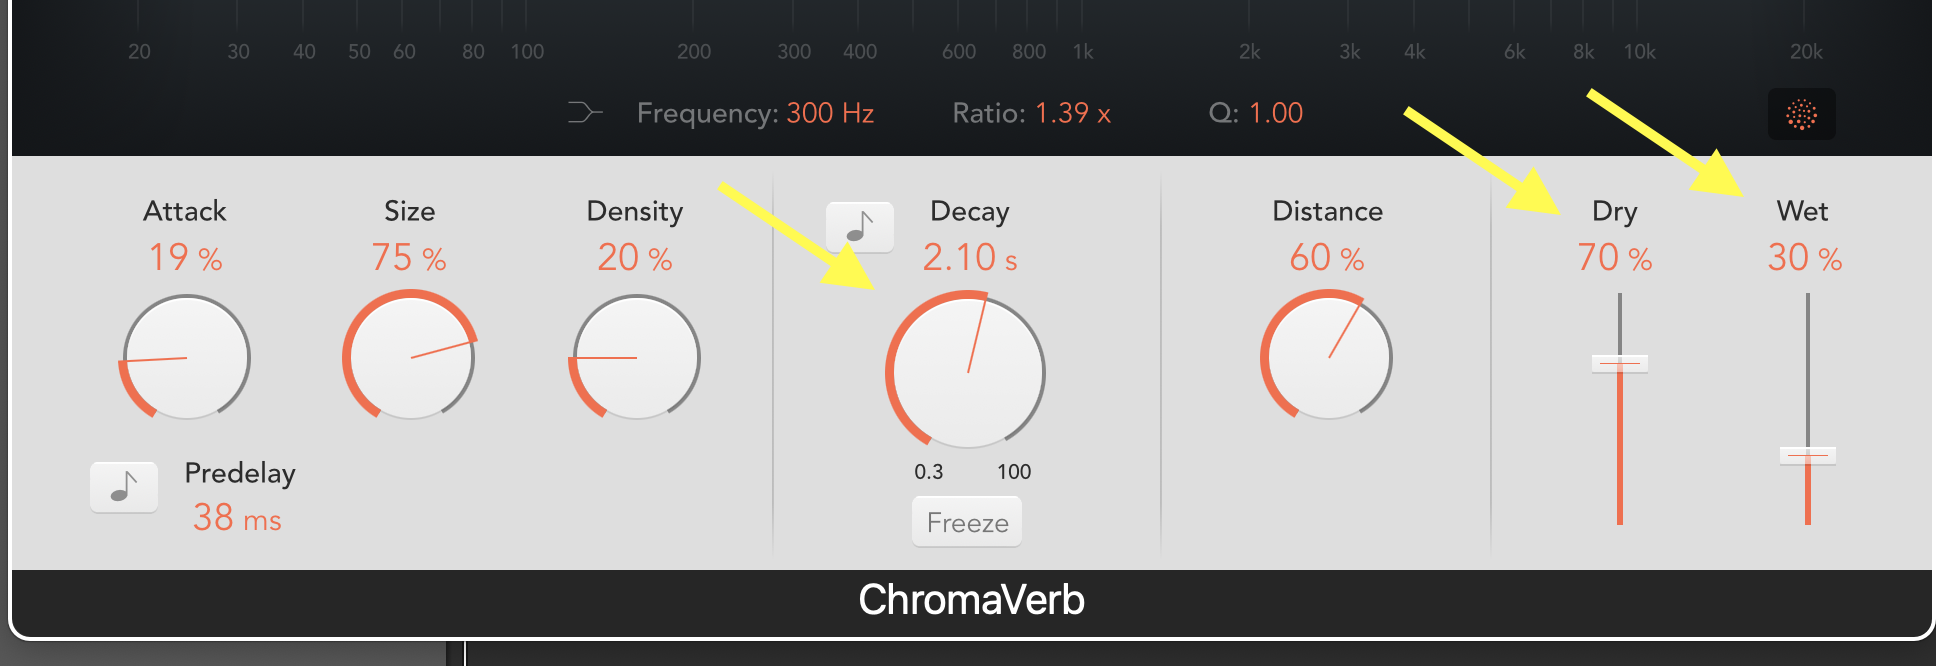
• Start the playback, then adjust the DRY and WET controls as discussed in class so that your improv sounds FAR AWAY (i.e., low DRY, higher WET). Then re-adjust the DRY and WET controls so that your improv sounds VERY CLOSE (i.e., high DRY, and low WET). Try out the DECAY control (and any other control). Make sure you can hear the effect of your changes.
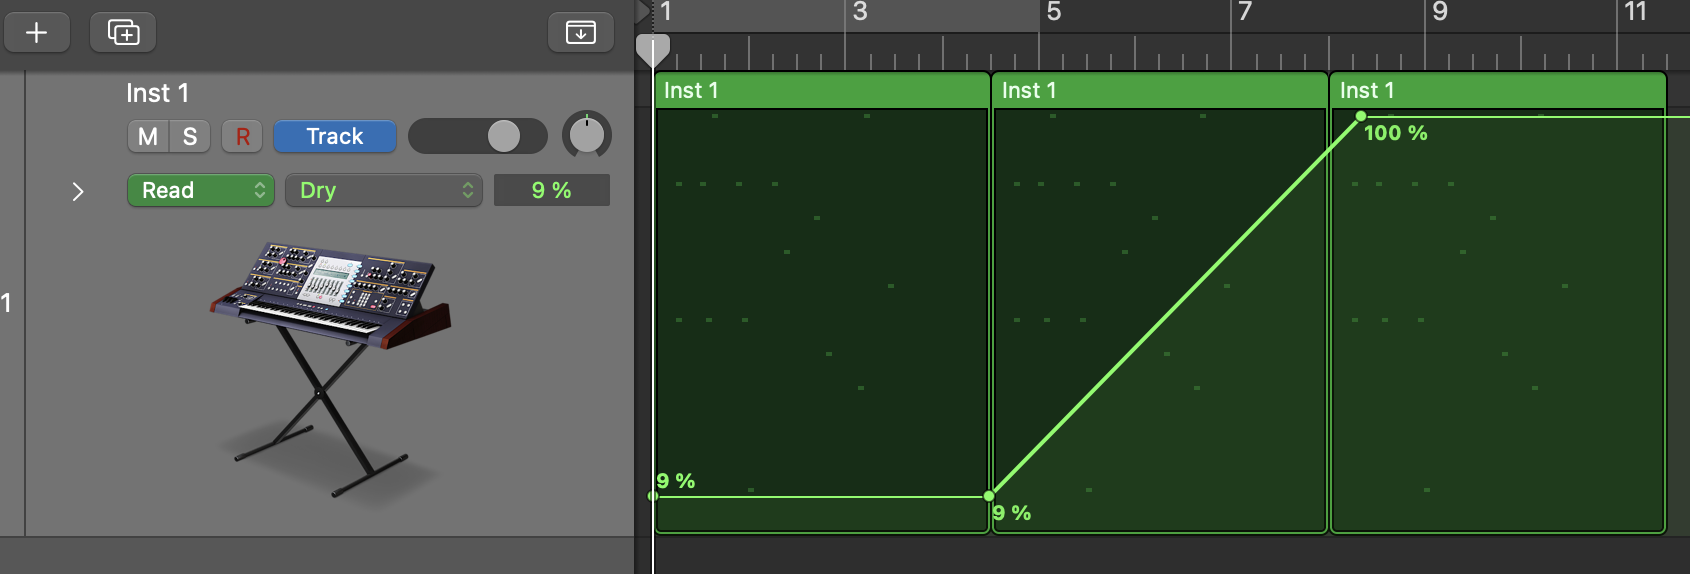
• Then, automate the DRY control so that your improv starts by sounding far, and slowly progresses to sounding near by the end of the third loop.
• Save your work.
Part 3
Compose a beat-based miniature, approximately 1-1.5 minute in length. There's no required style (i.e., it can be in any flavor of techno, hip hop, drum and bass, house, edm, etc.), but it should NOT be "experimental" sounding. Here we're going for familiar, "danceable" music with recognizable musical gestures.
As an example, you can find here the Logic project of the miniature I showed in class.
Also, here's the Zoom recording of last class, in case you missed a few details:
Requirements:
• Your piece MUST have an ABA form, where the B is a contrasting, mellower section, which builds up to a THUNDERING return of the A section. Repetition/looping is also a MUST.
• You can use ANY software instrument, but at least ONE MUST be a drum/percussion instrument.
• You MUST use AUTOMATION on a parameter OTHER that volume and pan.
• You MUST use REVERB to create a sense of depth (i.e., far/near) on at least ONE of you sounds.
• You MUST quantize your MIDI notes.
• You CANNOT use tempo 120 (it's fine to use a slow tempo), but your MUST stay in 4/4 time.
• You MUST use a reversed reverb sound to create at the transition between the B and final A section. See below for how to create such sounds.
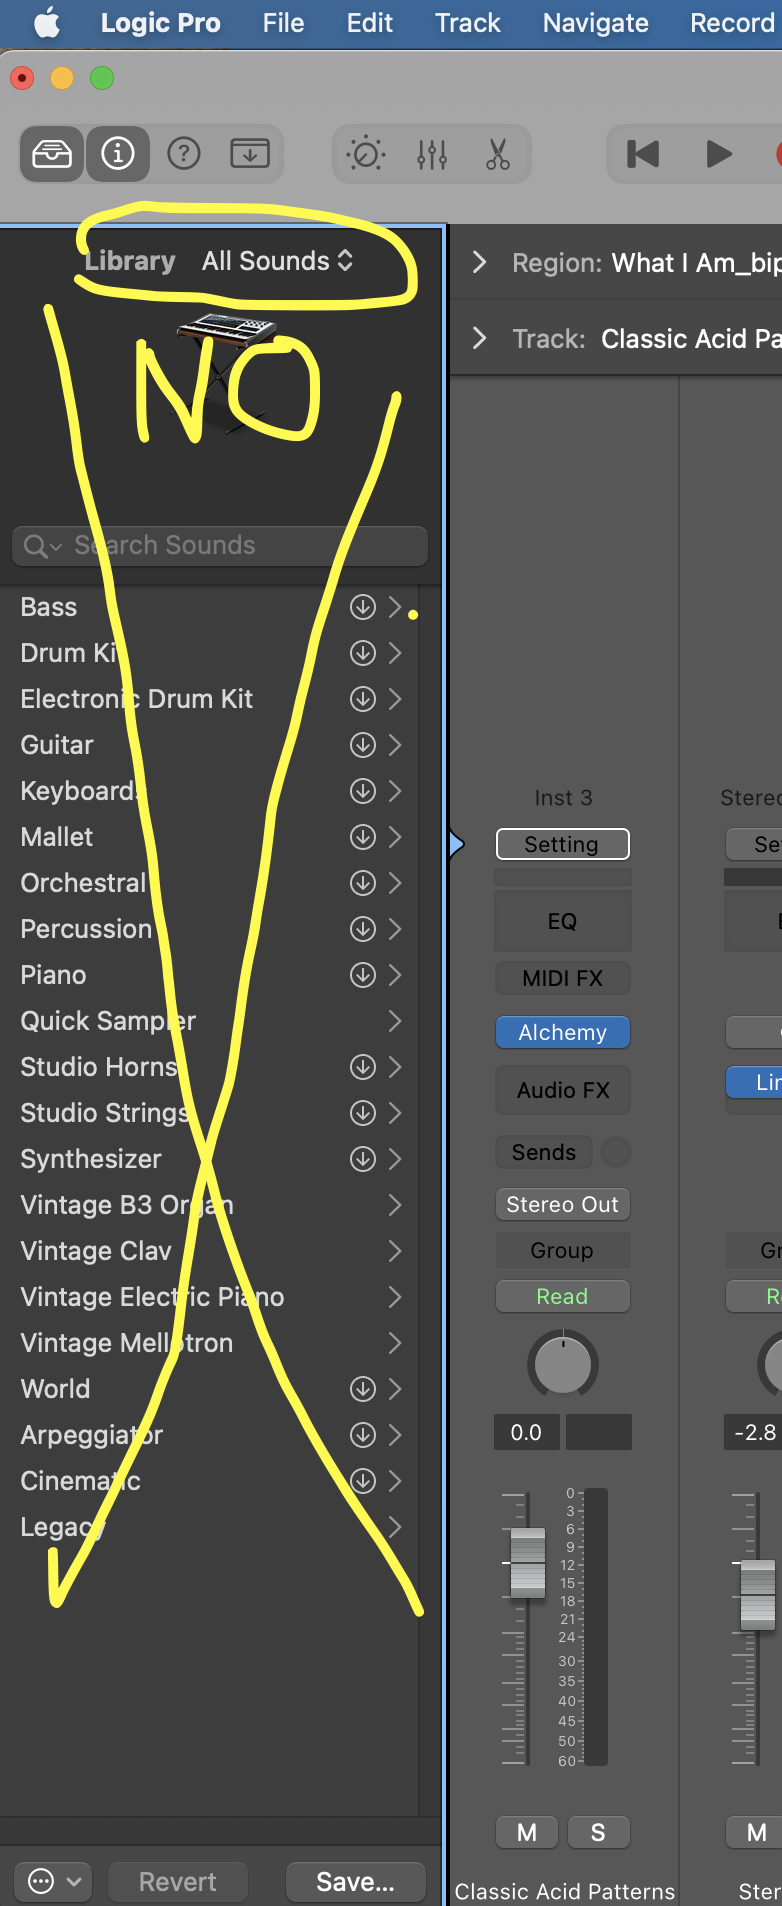
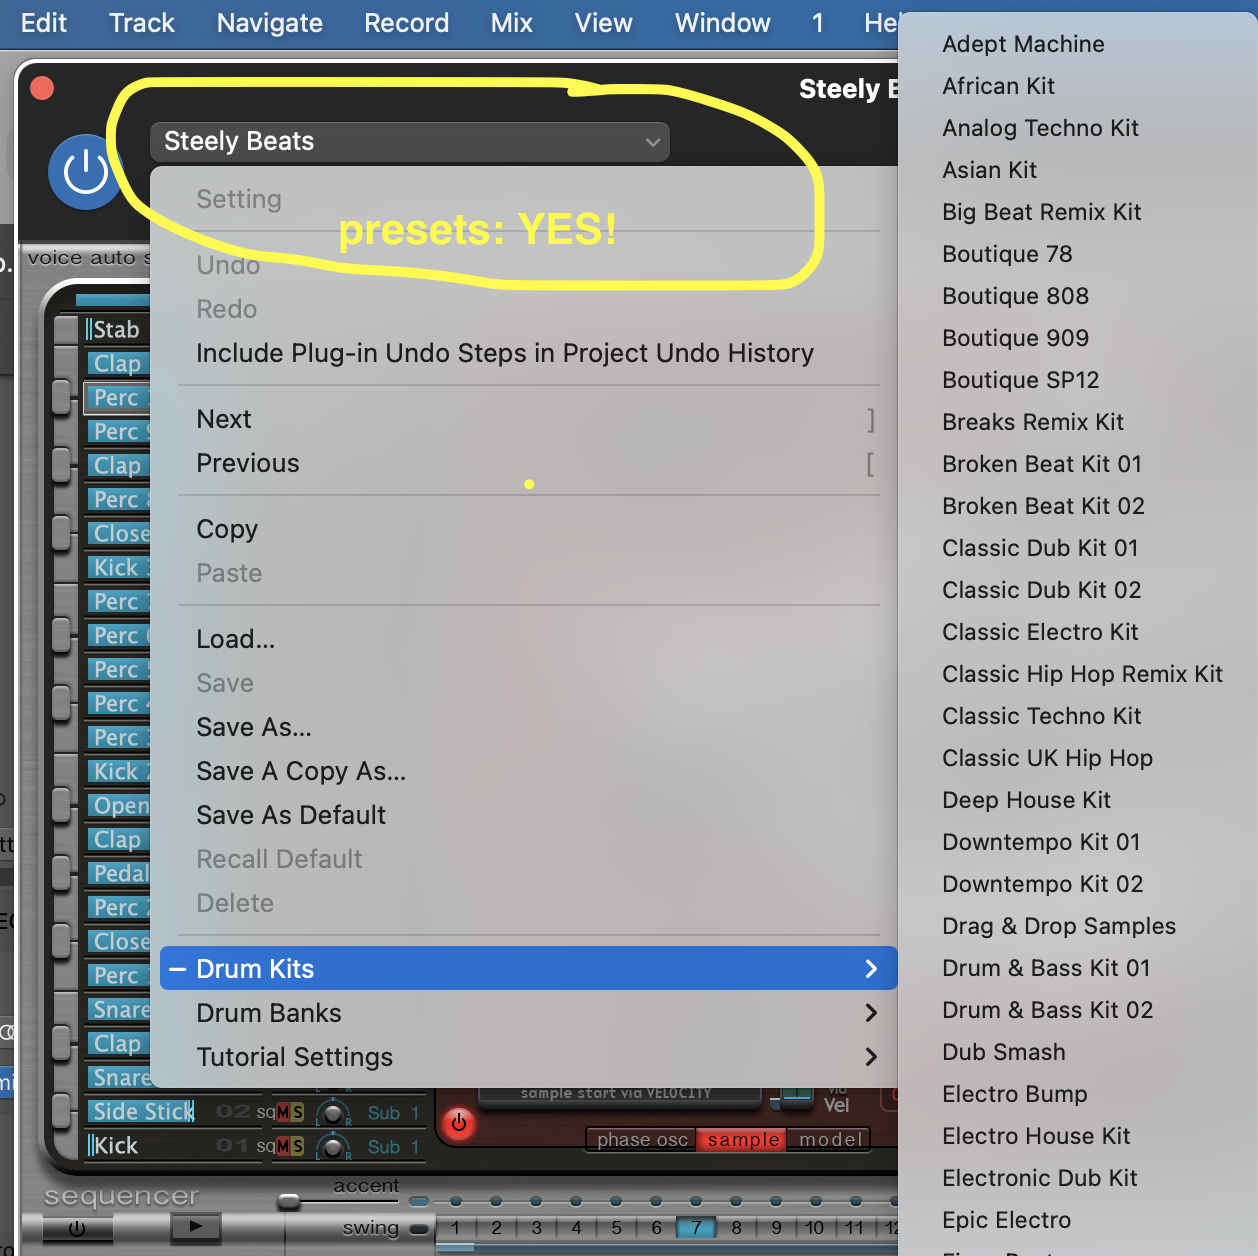
• You can use the presets of the instruments, but you CANNOT use the library.
 .
. 
Creating a Reverse Reverb Sound
• Create a new instrument track with the SAME synth as one of your other tracks.
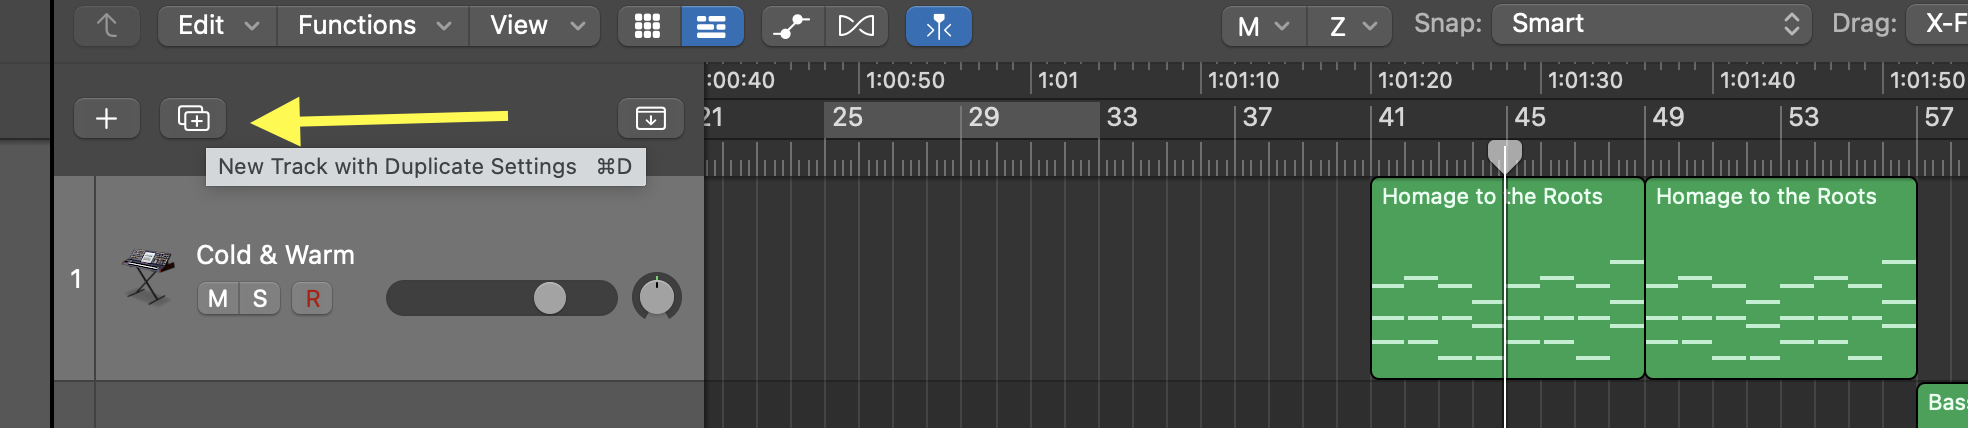
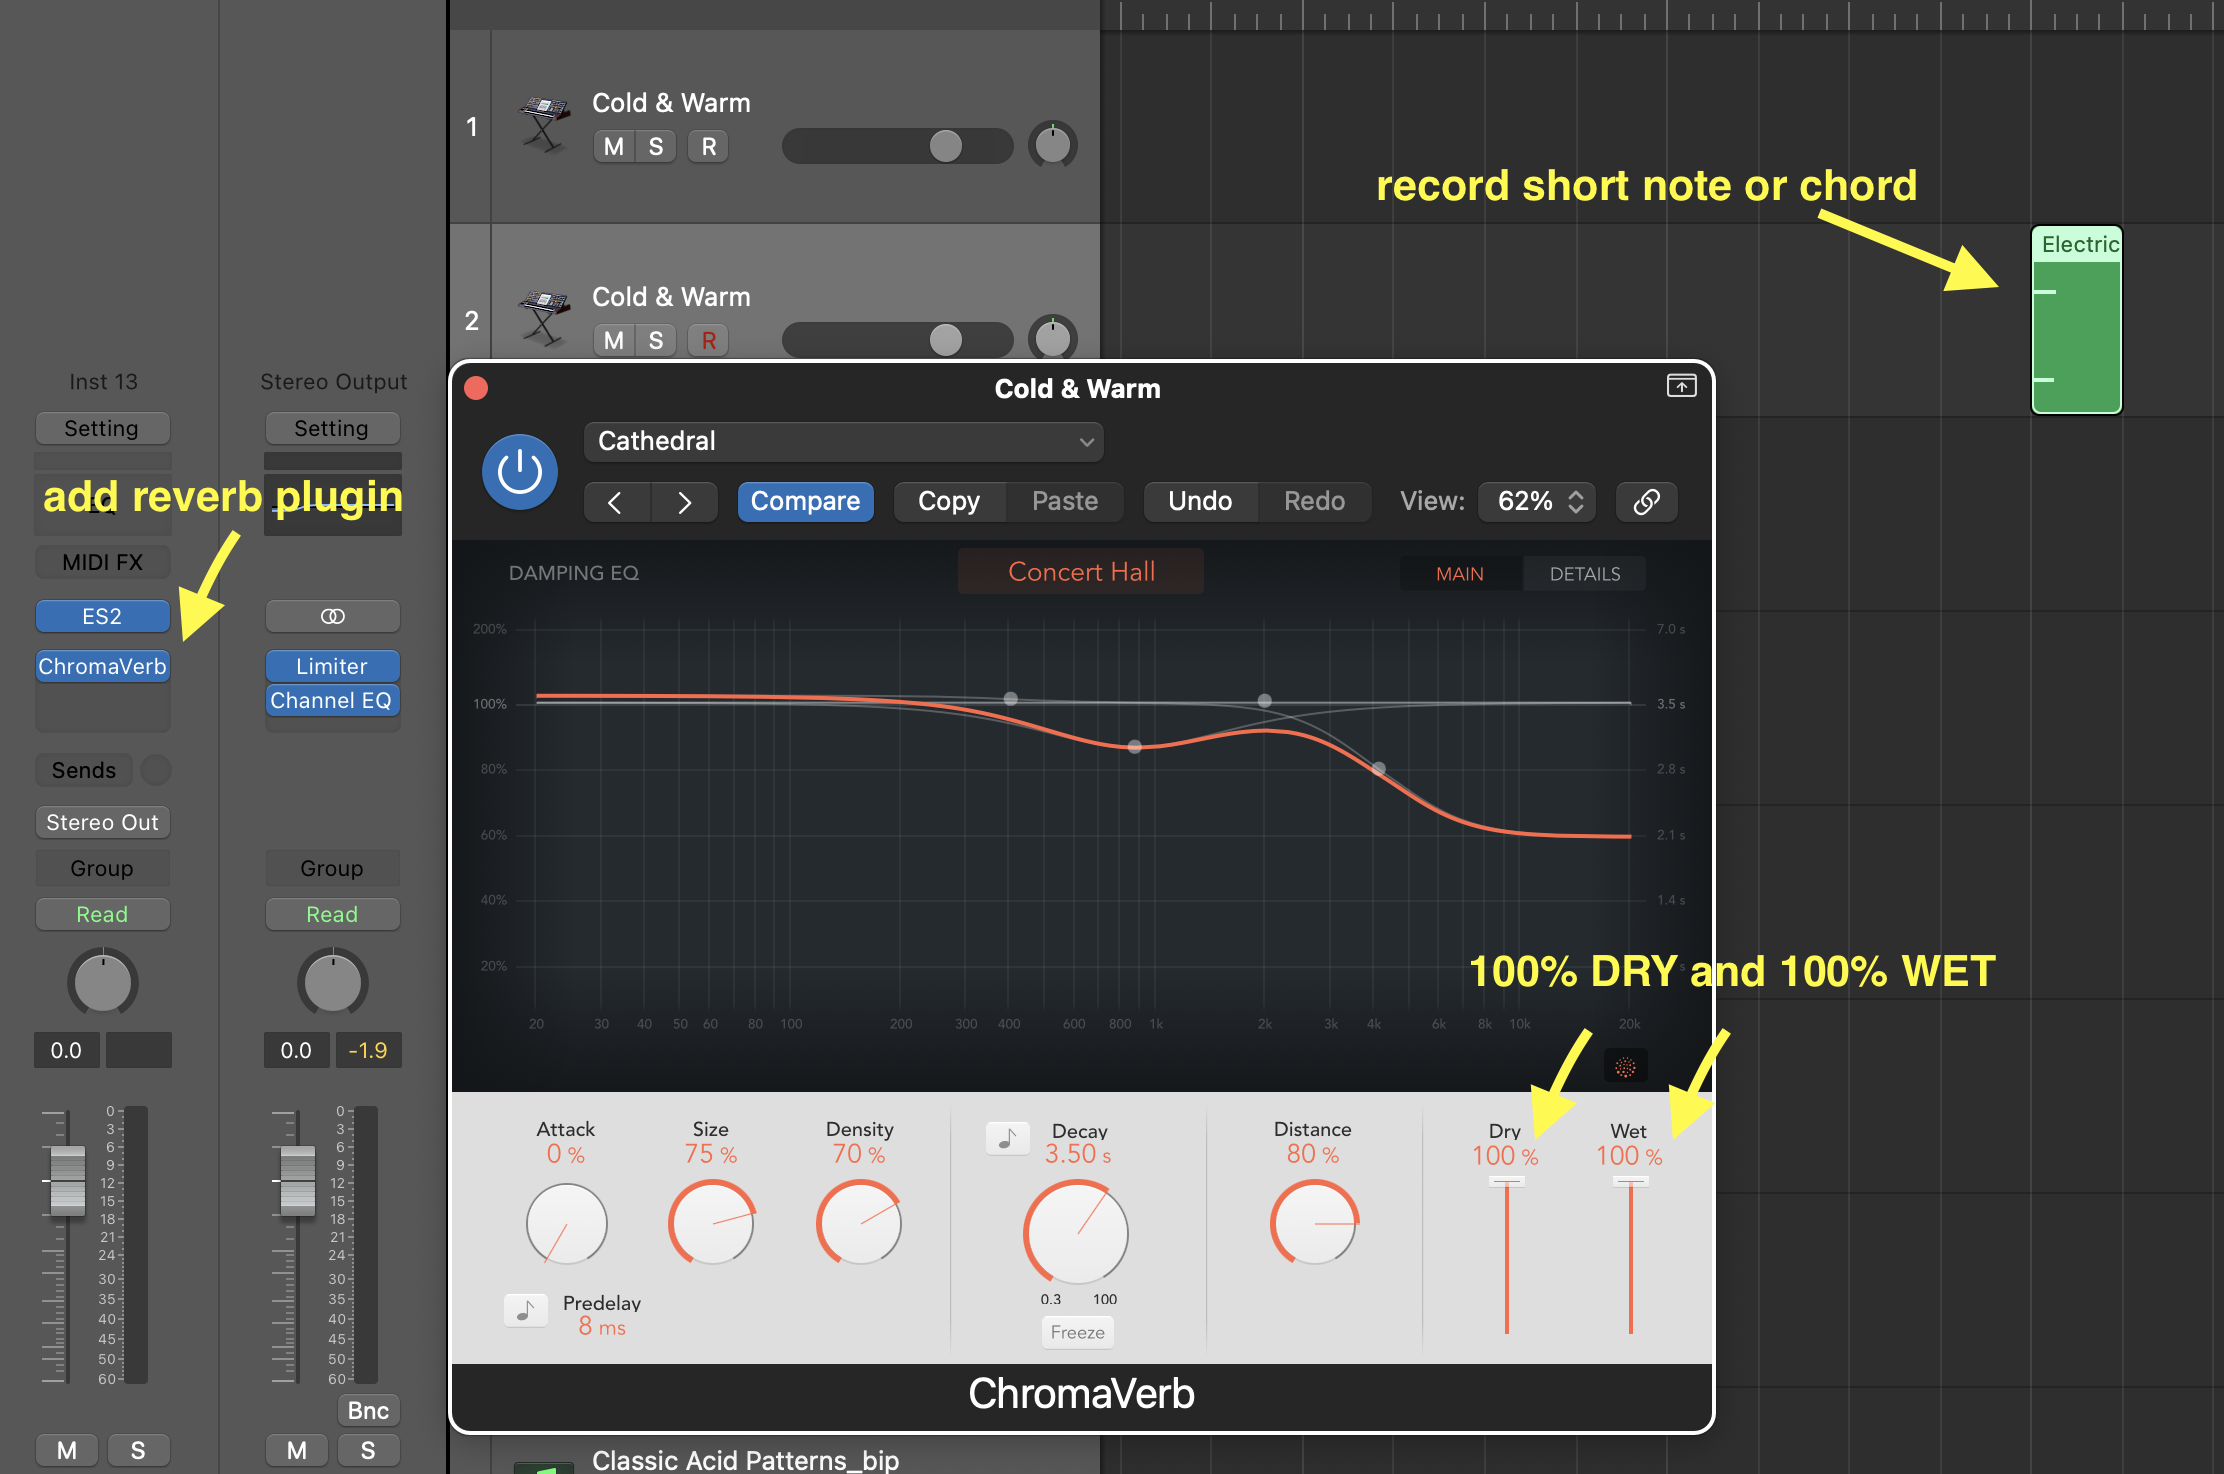
• Record a very short midi note or chord (preferably the tonic of the key)
• Add very long reverb to the track, and make the WET control 100%, and DRY 100%.
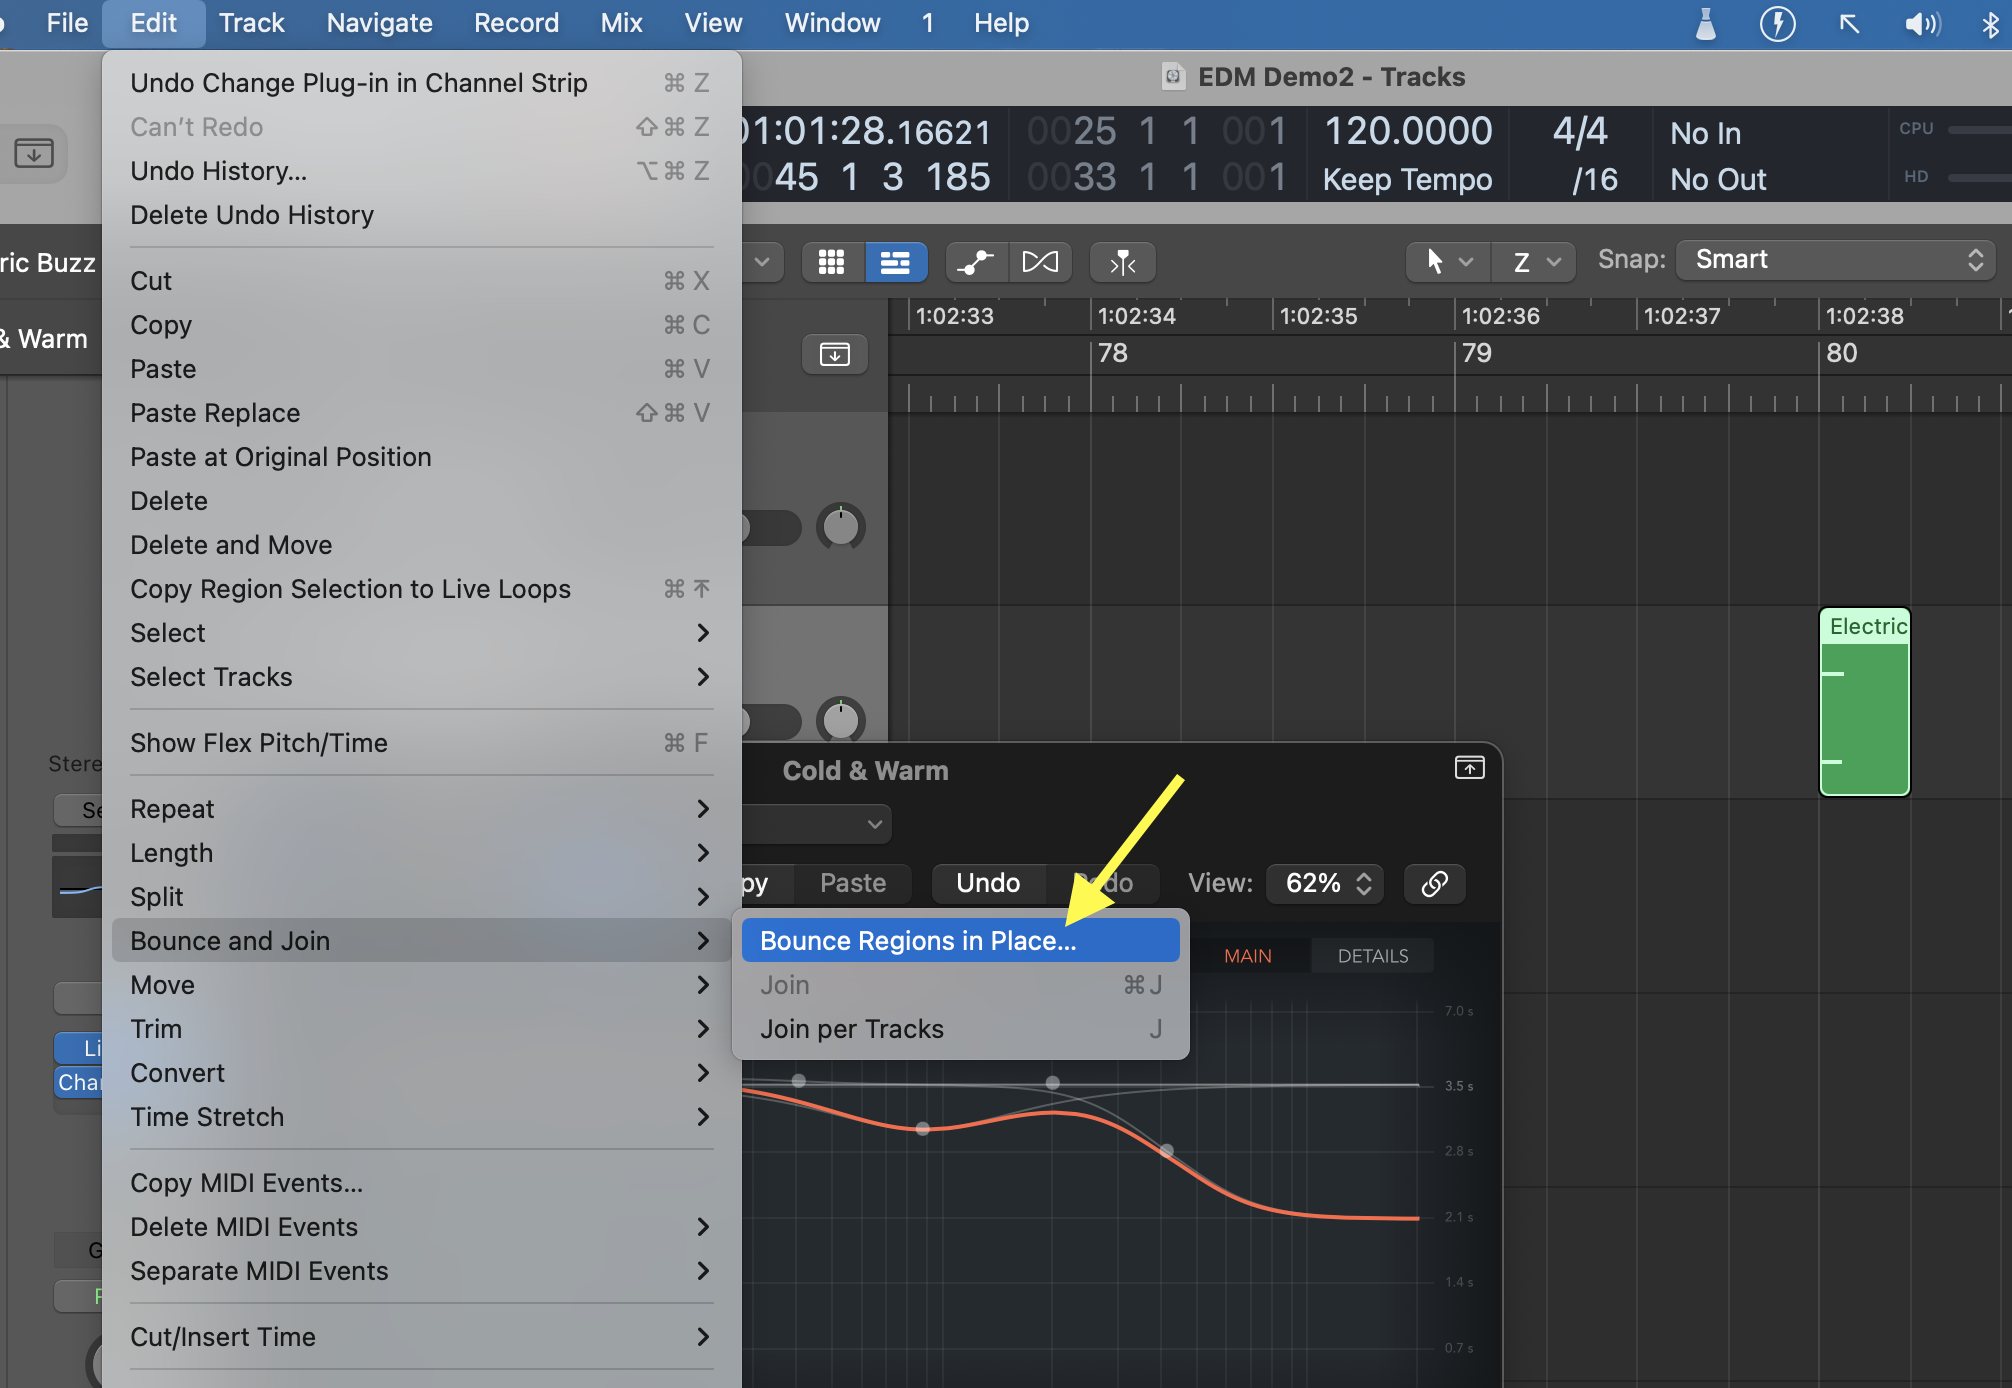
• Select the MIDI region of the very short note and go to Edit>Bounce and Join>Bounce in Place
• Apply these settings:
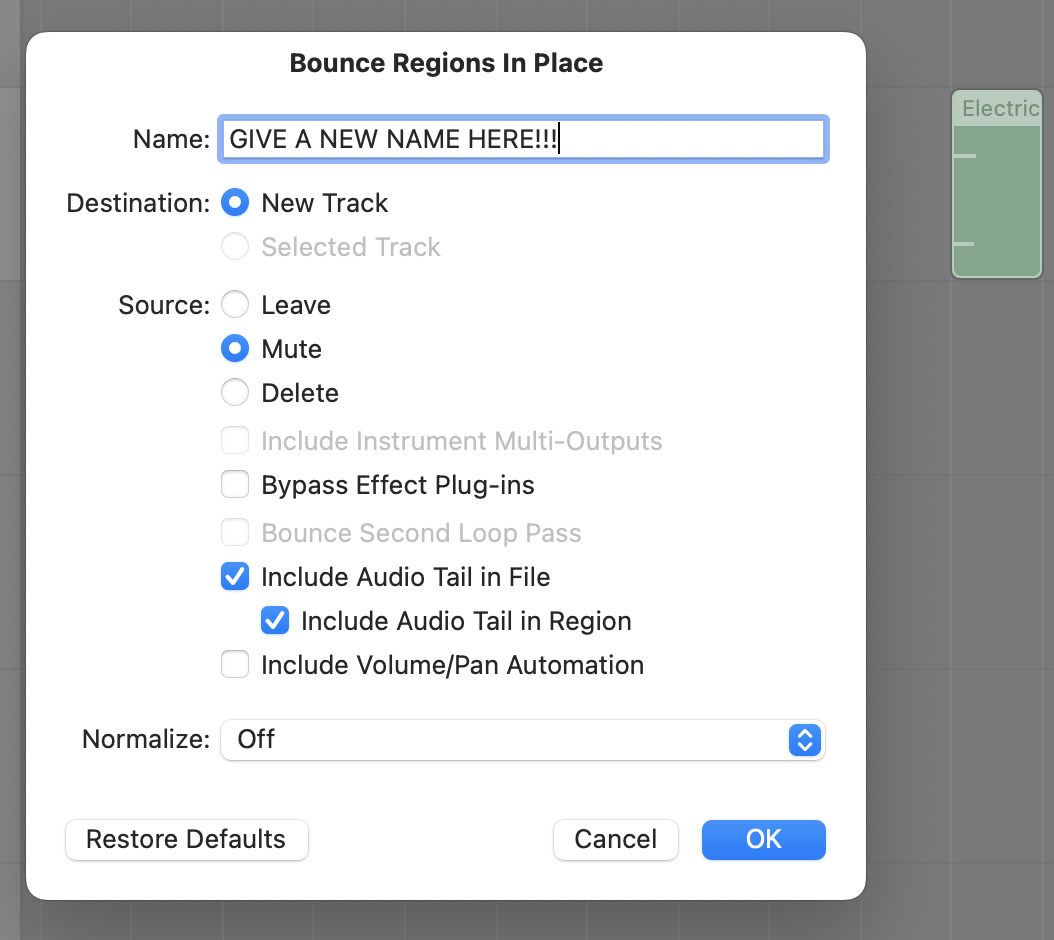
• Click on "Bounce". A new AUDIO track will be created with the sound of the short midi note and long reverb.
• Click on "reverse" in the Region editor.
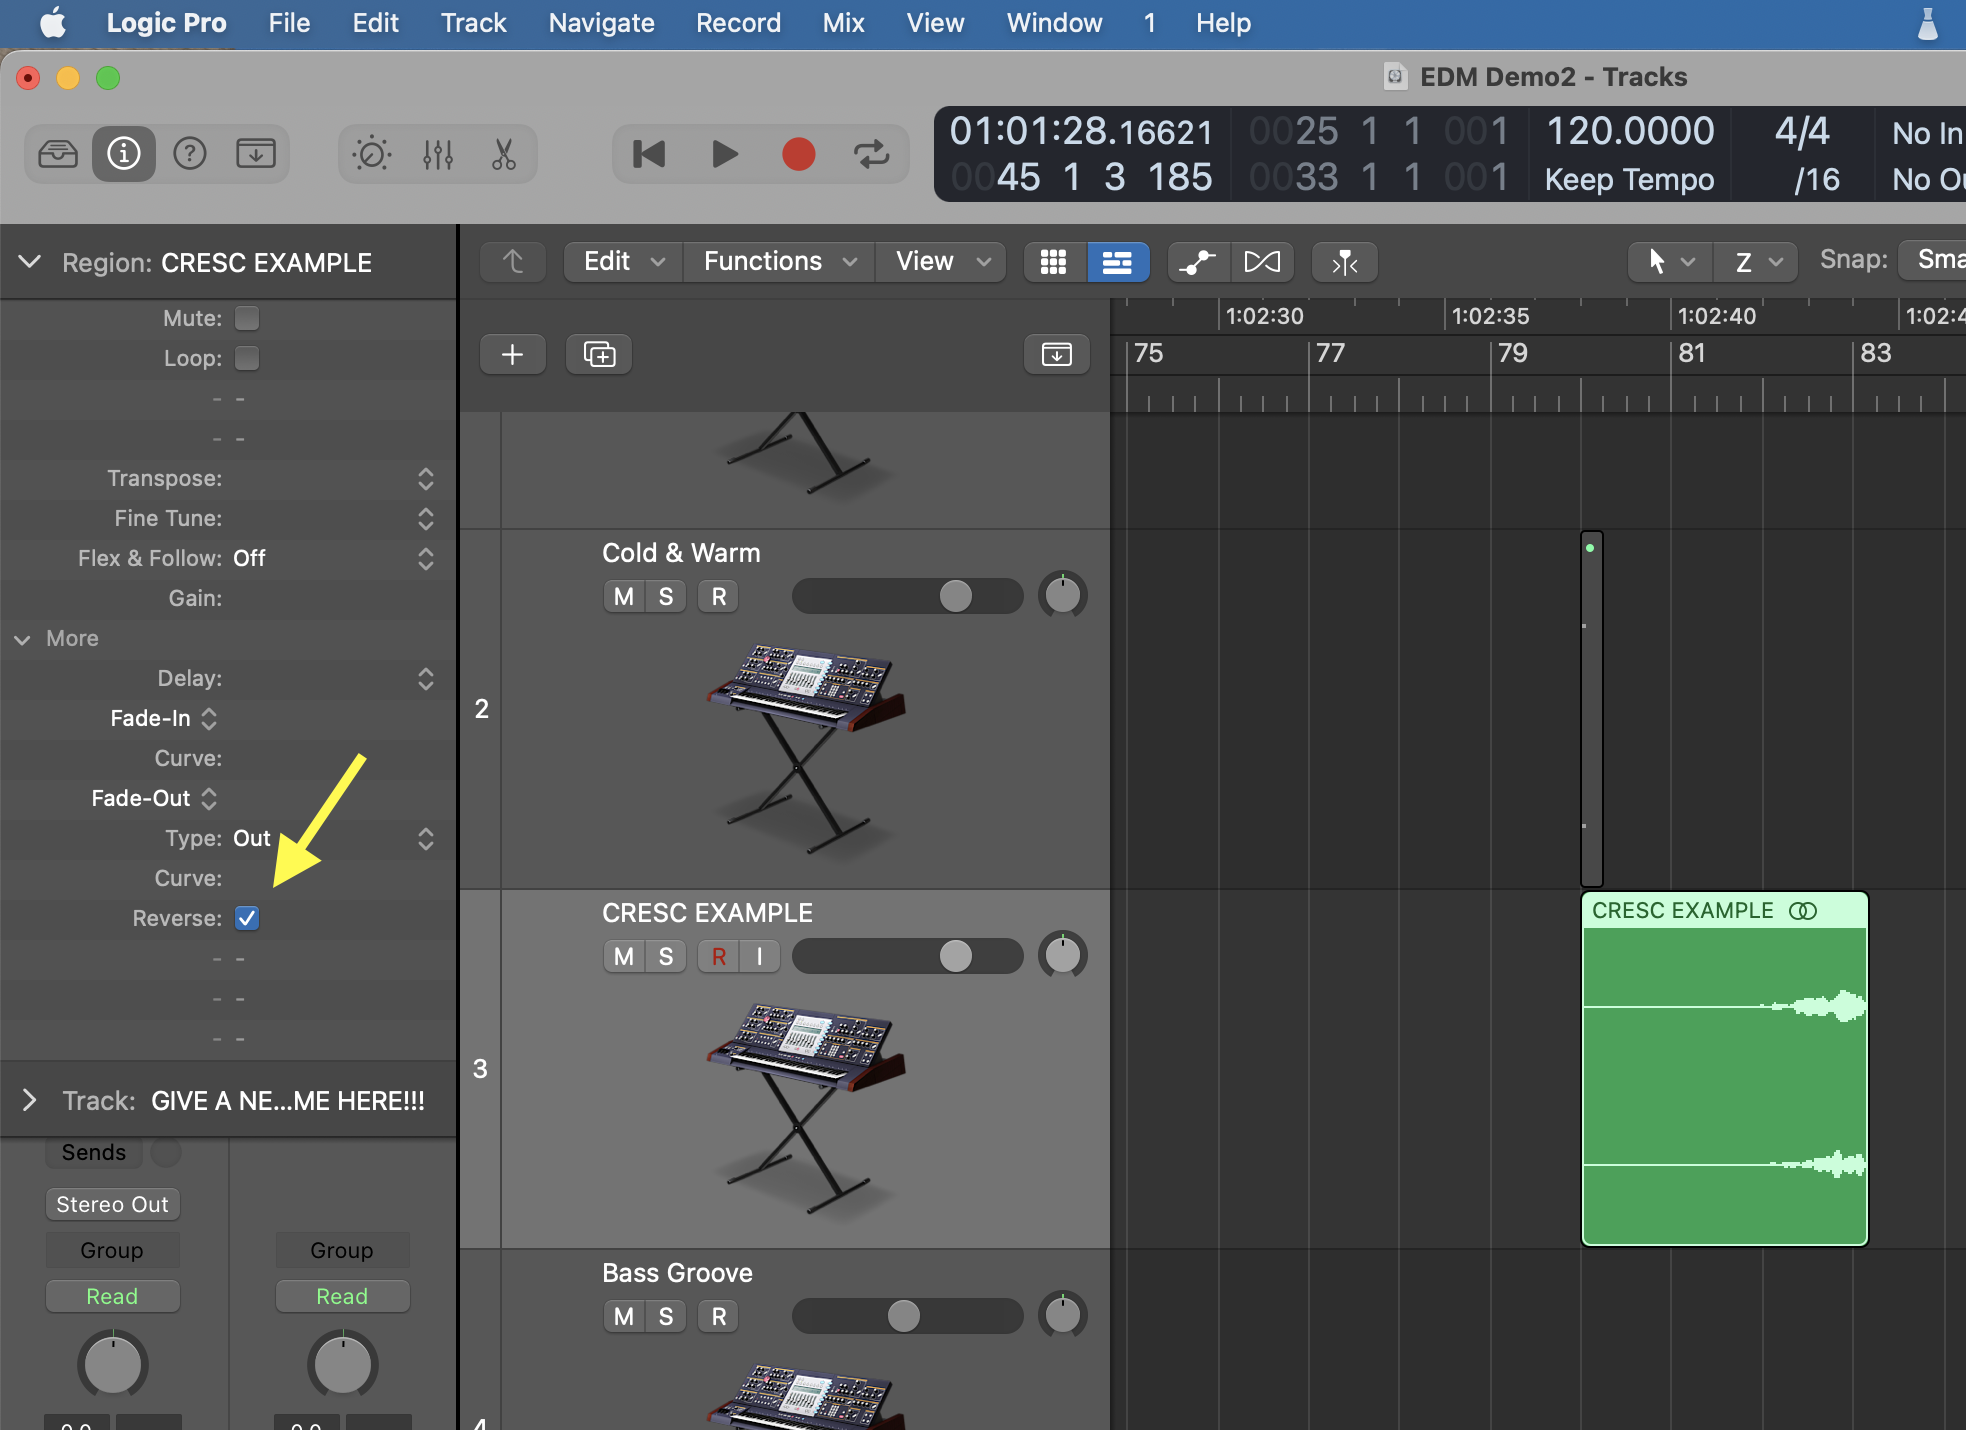
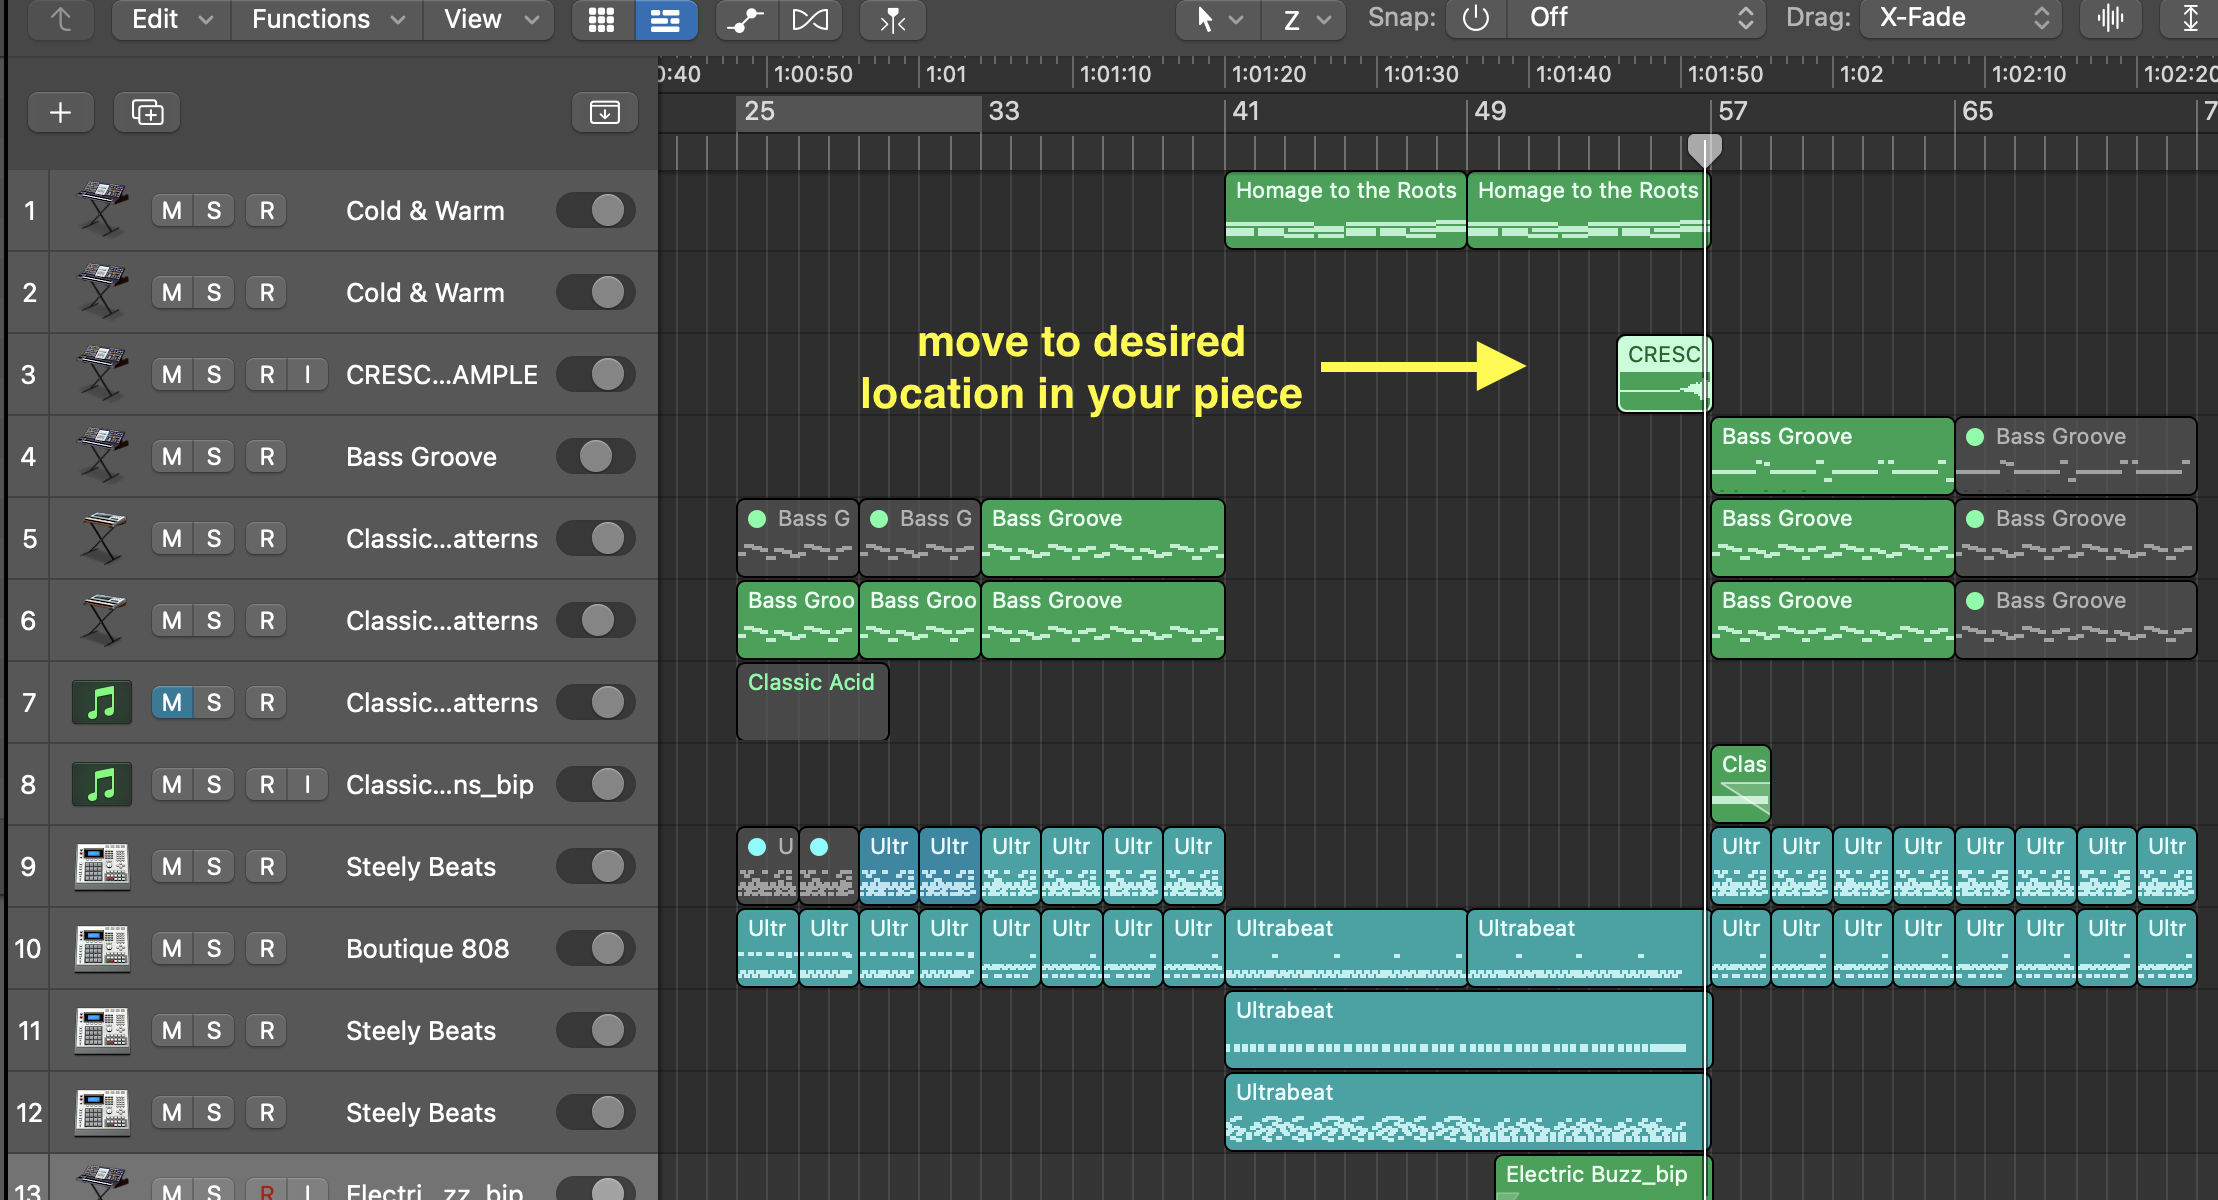
• Line up this new audio file at the appropriate moment in the piece.
Grading
/3 Good use of MIDI
/3 Correct reverse reverb
/3 Correct use of automation
/3 Correct use of reverb
/3 Correct use of EQ
Total /15